


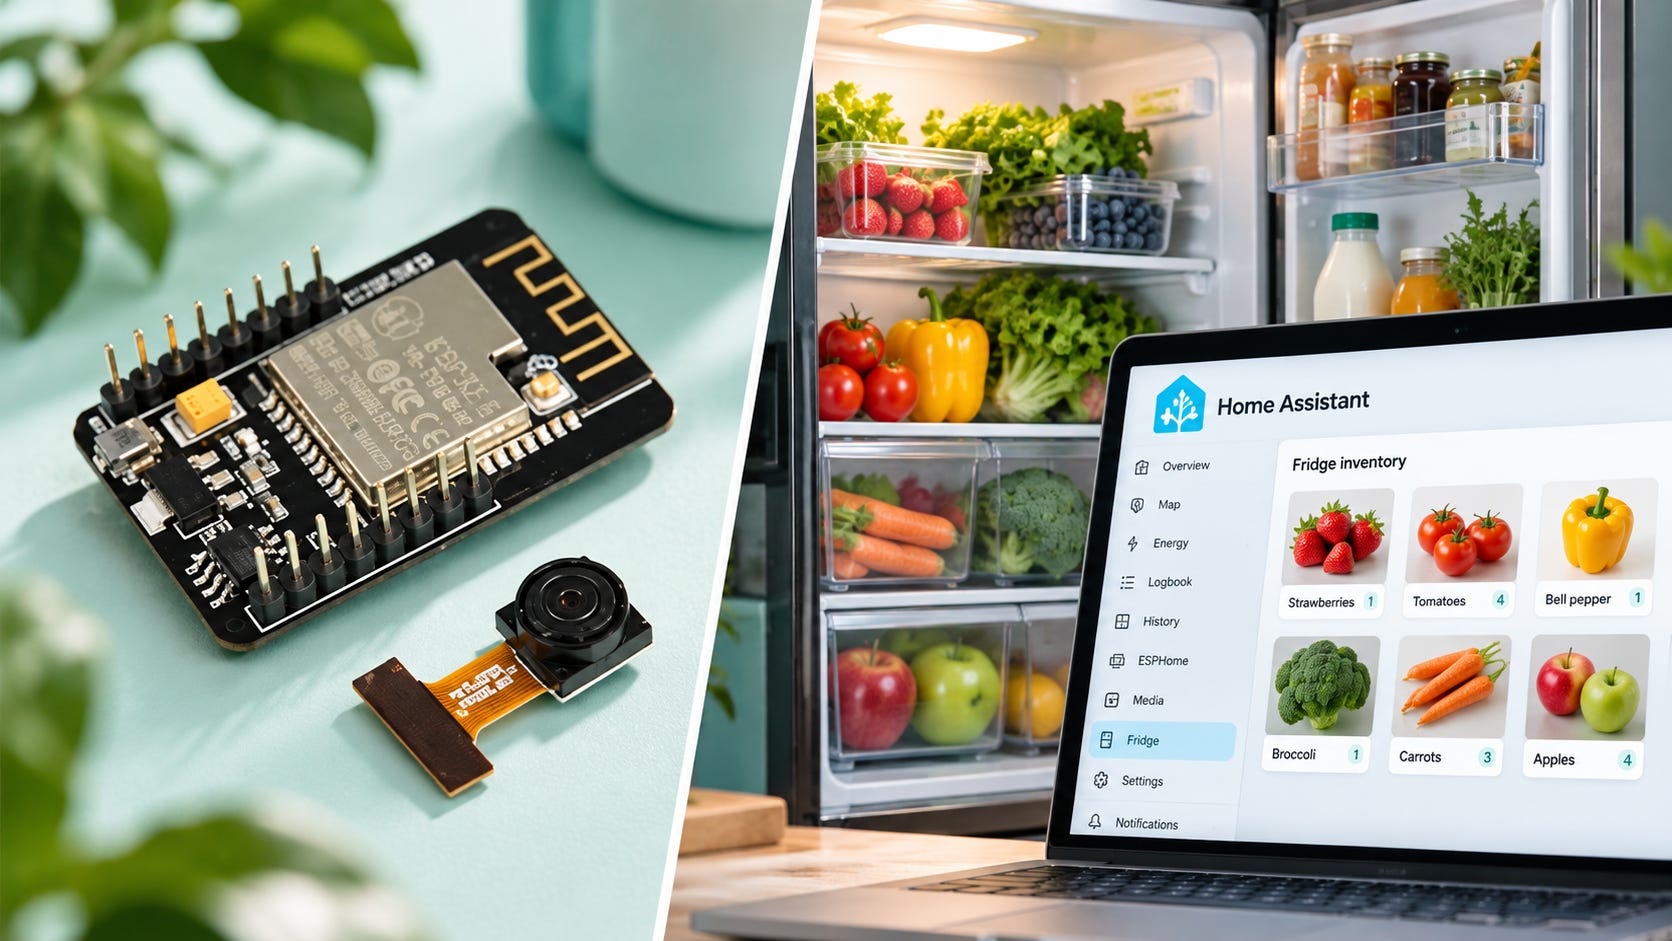
A DIY AI fridge camera does not need continuous video, custom machine-learning code, or an expensive smart refrigerator. A cheap ESP32-CAM, a magnetic door sensor, Home Assistant, and a vision model are enough to photograph the contents when the door opens and turn each scan into an editable food inventory.
Developer Jan Dubovsky has published the two main pieces as the MIT-licensed fridge-core project for the ESP32-CAM and Home Assistant automation and the companion fridge-card dashboard for editing the detected inventory.
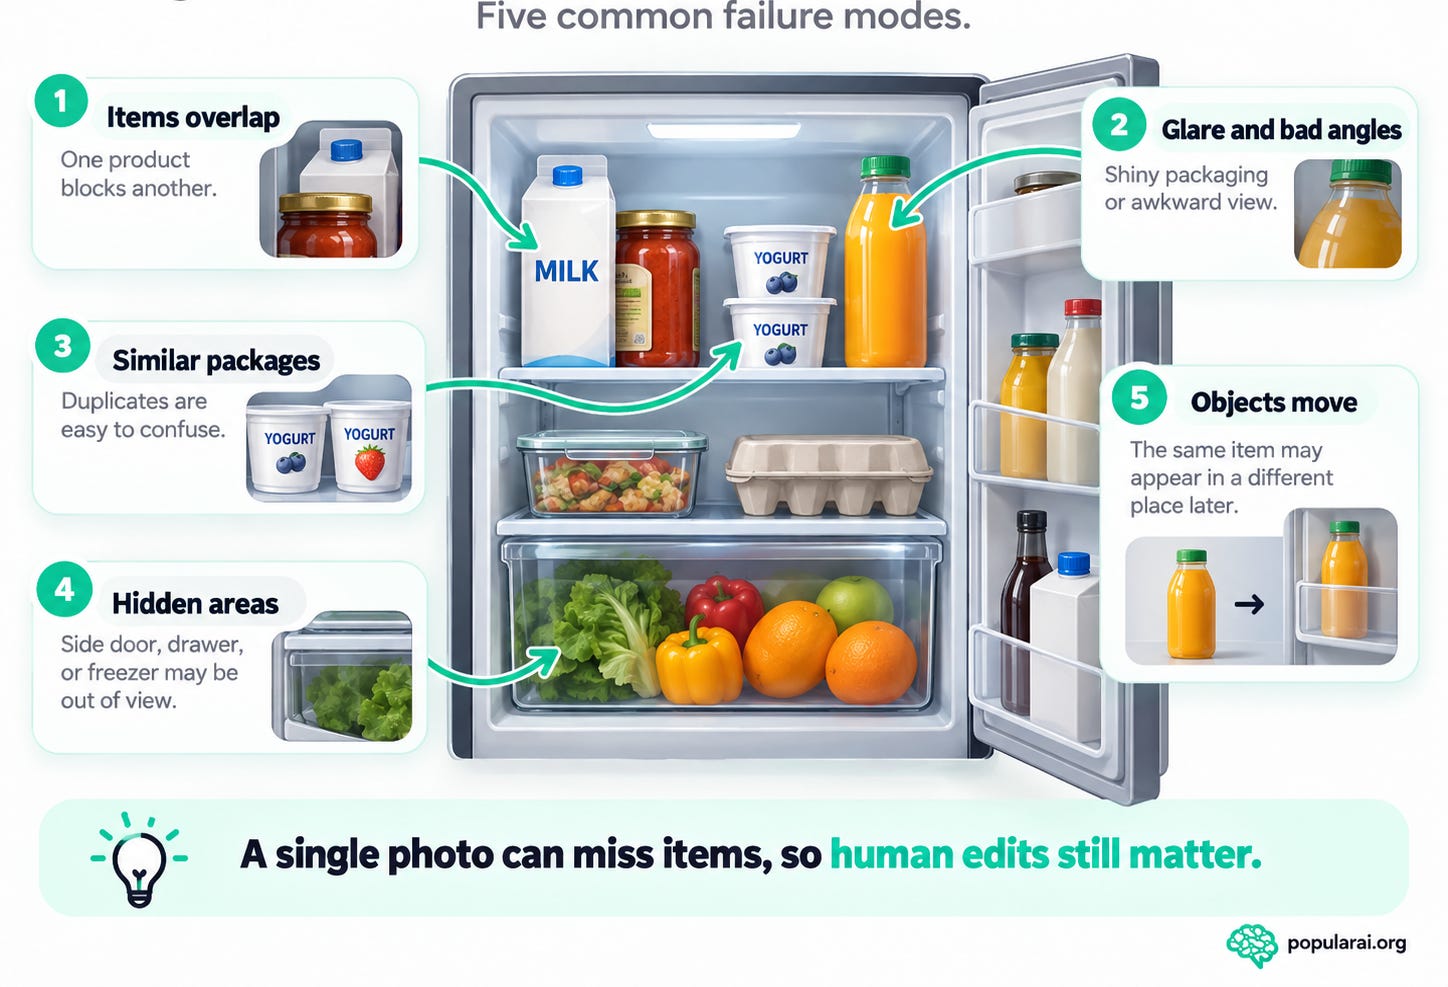
The hard part is not taking the picture. Refrigerators are ugly computer-vision environments. Packages overlap, labels face the wrong way, vegetables hide behind cartons, and an item that was visible yesterday may be buried today. Treat this as an AI-assisted inventory that you can correct, not a database you can trust without checking.
This guide follows the current project repositories, Home Assistant documentation, and the project issue tracker. It is not a long-term physical test of electronics running inside a working refrigerator.
Quick breakdown: how the DIY AI fridge camera works
The simplest build uses an AI-Thinker ESP32-CAM, a magnetic reed switch, Home Assistant, the project’s automation blueprint, and a vision-capable AI Task provider.
When the refrigerator door opens, the workflow:
Turns on the ESP32-CAM’s LED.
Waits for the refrigerator interior to be illuminated.
Saves a 640×480 JPEG snapshot.
Sends the image through Home Assistant’s
ai_task.generate_dataaction with an image attachment.Parses the model’s response into individual food items.
Adds or updates those items in a Home Assistant To-Do list.
Displays the result through the optional fridge-card dashboard.
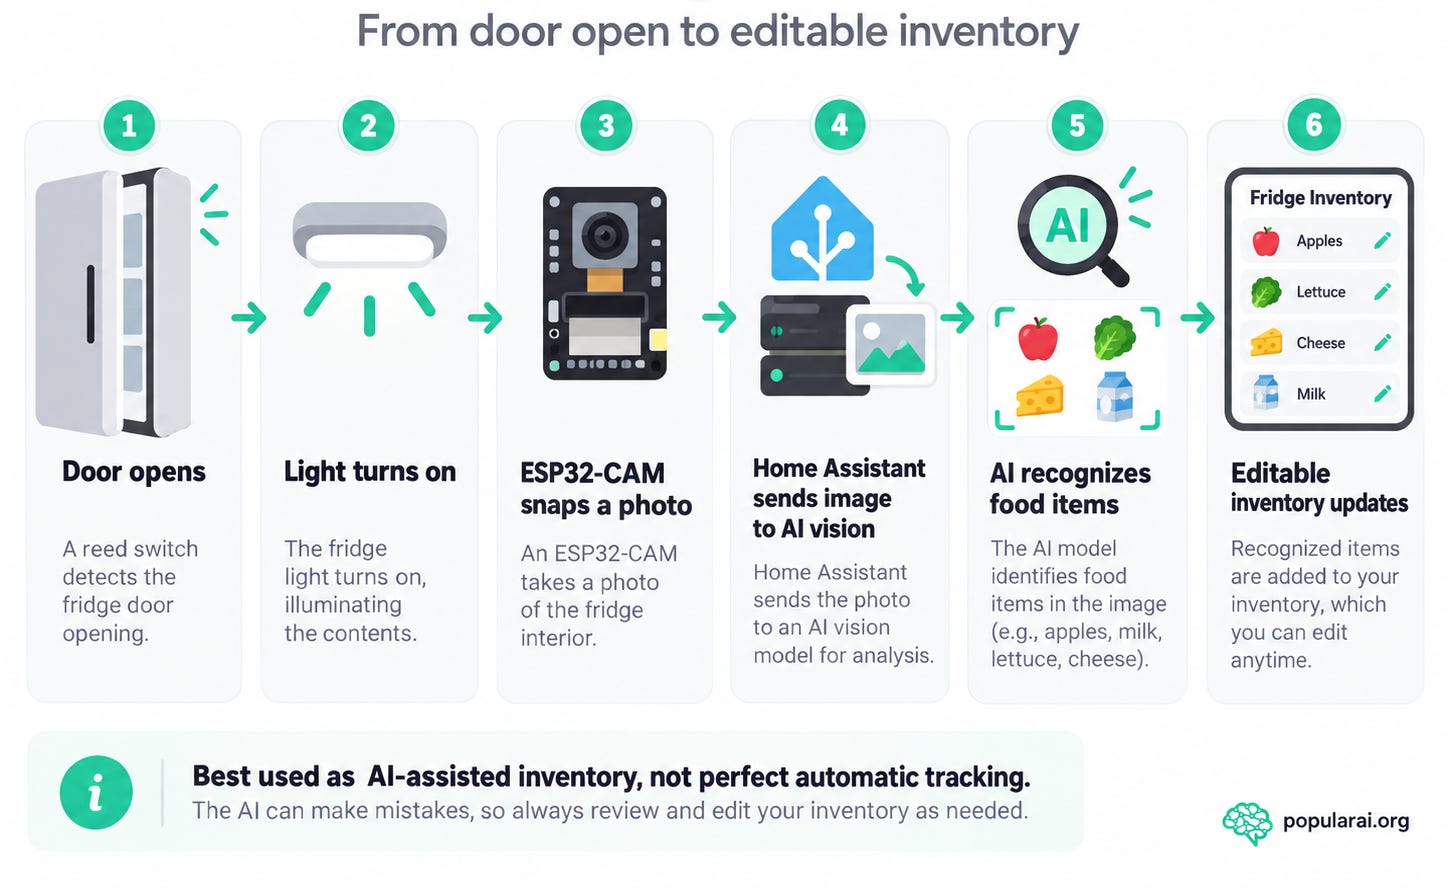
The current code can also estimate where each object appears in the photograph, which lets the dashboard draw detection frames over the image.
Inventory accuracy remains the main limitation. The system deliberately does not remove an existing item just because the next photograph fails to detect it. That is a sensible failure mode because a jar hidden behind a milk carton, for example, has not necessarily left the refrigerator.
Who this Home Assistant fridge build is for
This project makes sense if you already use Home Assistant and are comfortable with ESPHome, simple GPIO wiring, HACS, and the occasional YAML edit.
You do not need machine-learning experience. The ESP32-CAM captures the image, while the vision work happens through Home Assistant’s AI Task layer.
Skip this build if you need exact stock tracking. A single camera cannot reliably see through packages, drawers, side-door shelves, stacked food, or opaque containers. Barcode scanning or a manually maintained inventory is a better fit when exact counts are the requirement.
For a heavier example of Home Assistant plus computer vision on hardware you control, Popular AI’s Frigate AI NVR build for Home Assistant covers a much more demanding local vision setup.
More on AI Home Assistant builds:

What you need before starting
Disclosure: This post includes Amazon affiliate links. If you buy through them, Popular AI may earn a small commission at no extra cost to you.
An ESP32-CAM with an OV2640 camera. This is the camera, Wi-Fi device, and controller for the build. The project’s ESPHome configuration uses the common Ai-Thinker ESP32-CAM pinout, so the board does not need to be Ai-Thinker-branded as long as it uses that layout.
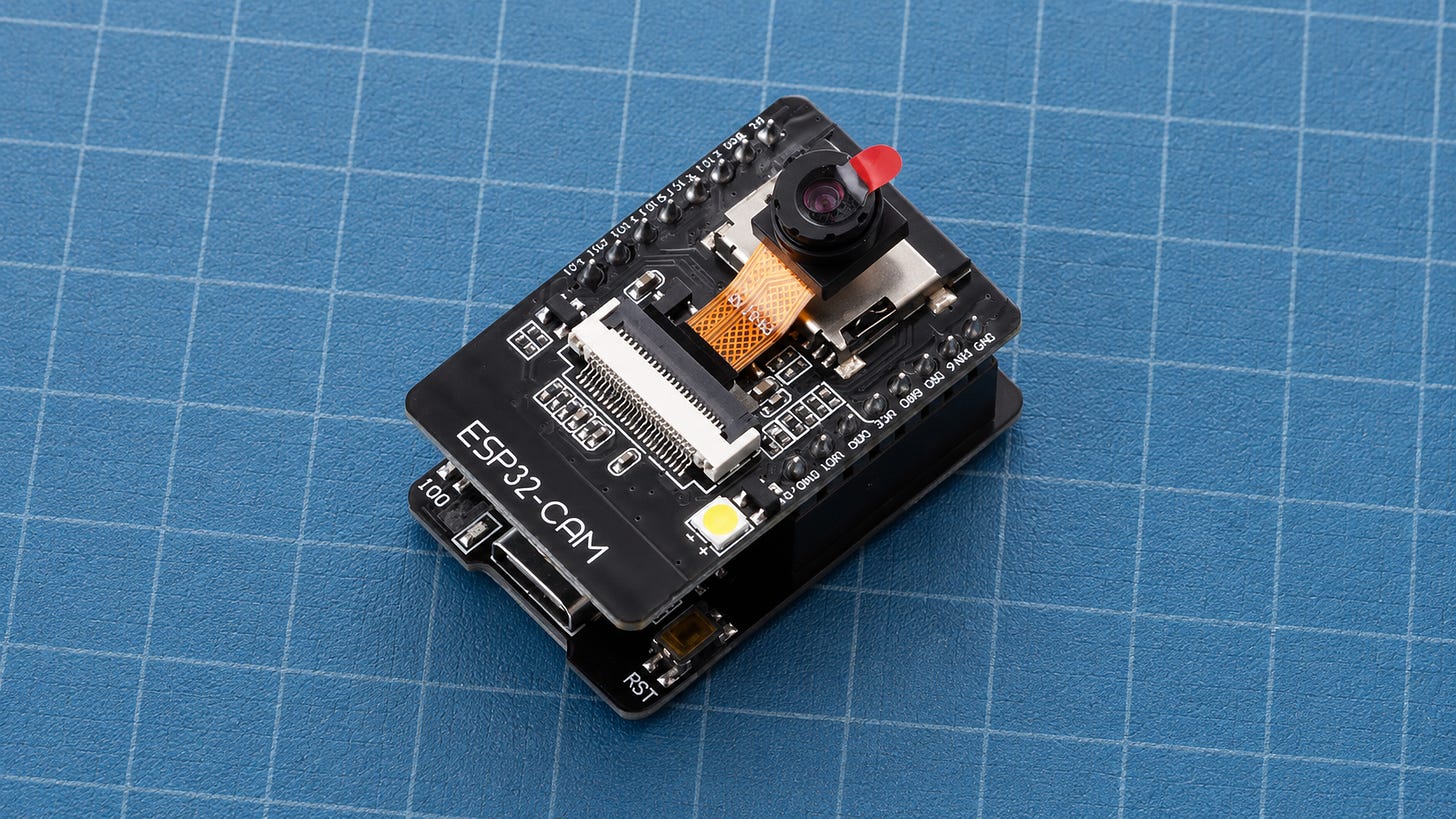
This ESP32-CAM + OV2640 kit is a practical option and includes a USB programmer board for flashing ESPHome.
A normally-open magnetic reed switch. This detects when the refrigerator door opens and triggers the camera workflow. The project’s configuration connects it directly between GPIO13 and GND.
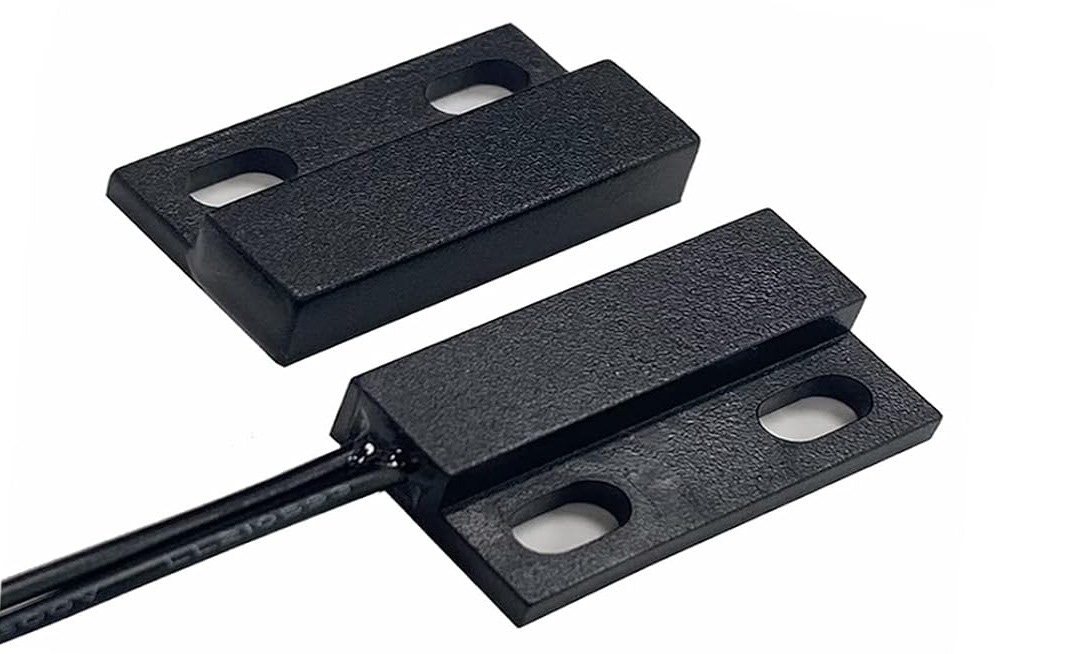
This 2-wire normally-open magnetic reed switch is the right type. You do not need a separate Zigbee, Z-Wave, or Wi-Fi door sensor.
A USB data cable and 5V power supply. You need a data-capable USB cable to flash the ESP32-CAM and a stable 5V supply for normal operation. If your programmer uses Micro-USB, this Amazon Basics Micro-USB data cable will do the job. If your programmer has USB-C instead, use a USB-C data cable. For permanent power, a 5V 2A USB wall adapter is sufficient for this type of setup. Keep the mains adapter outside the refrigerator.
A way to connect the door sensor. For testing, 2.54 mm female Dupont jumper wires are convenient. For a permanent installation, soldered and insulated connections are more reliable.
A secure camera mount. A fixed viewpoint makes the AI results much more consistent.
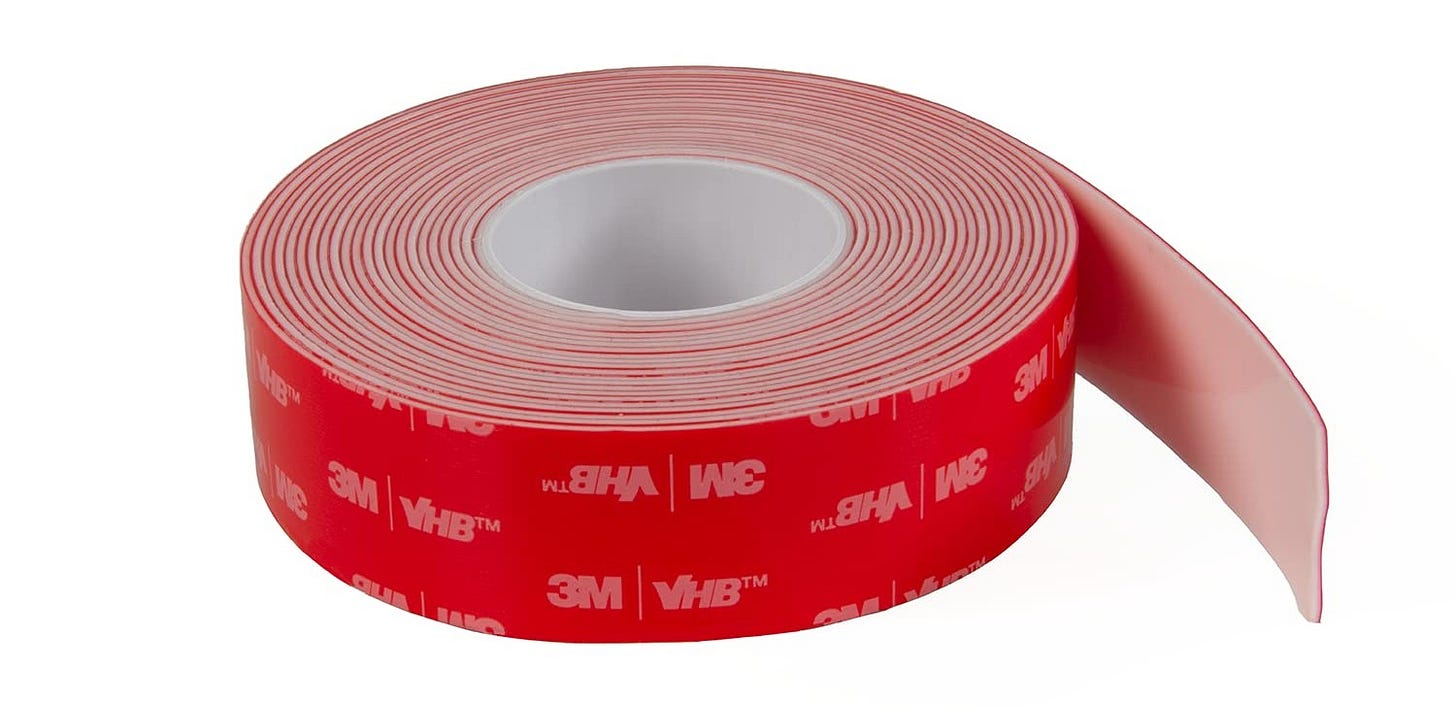
We recommend 3M VHB LSE-110WF mounting tape, which 3M rates for difficult plastics, appliance applications, moisture resistance, and installation on clean surfaces down to 32°F/0°C.
Mount the ESP32-CAM to a small nonconductive bracket or enclosure rather than sticking tape directly across exposed circuitry. See 3M’s LSE-110WF specifications for the bonding requirements.
A working Home Assistant installation with ESPHome. Home Assistant coordinates the door sensor, camera snapshot, AI analysis, and inventory. ESPHome handles the ESP32-CAM itself. If you already run Home Assistant, you do not need a separate computer for this project. Start with the project’s fridge-core repository.
A vision-capable AI Task integration. Home Assistant needs an AI provider that can accept images through
ai_task.generate_data. The fridge project lists integrations such as Google Generative AI and OpenAI Conversation as examples. Without this step, the camera can still take photos, but it cannot automatically identify the food in them.A dedicated Home Assistant To-Do list. Create one called something like Fridge Contents. The automation uses it as the editable inventory, storing recognized items and their quantities, condition, confidence, notes, and other fields.
A folder for snapshots. Create
/config/www/fridge/in Home Assistant. The default automation saves the latest image as/config/www/fridge/fridge_latest.jpgbefore sending it for AI analysis.Optional: the Fridge Card dashboard. The companion Fridge Card shows the latest refrigerator image and gives you a cleaner interface for reviewing and correcting the AI-generated inventory. It is not required for the automation to work, but it makes the finished system much easier to use.


The project’s ESPHome configuration uses the common AI-Thinker pinout, 640×480 resolution, GPIO4 for the onboard LED, and GPIO13 for the reed switch. ESPHome’s ESP32 camera documentation covers the corresponding camera configuration.
A refrigerator adds a physical problem that ordinary bench projects do not. It is cold and humid. The repository allows inside or outside mounting, but it does not specify a sealed enclosure or certify the electronics for condensation. Keep the board dry, avoid routing a cable in a way that damages the door gasket, and do not modify the refrigerator’s mains wiring.
Bench-test everything at room temperature before deciding where the camera belongs.
What the finished AI fridge inventory looks like
Opening the refrigerator door triggers a new photograph. Home Assistant analyzes it and maintains an editable food list with fields such as item name, quantity, condition, confidence, notes, and estimated location in the image.
The optional dashboard adds the latest photo, inventory editing, detection frames, expiration dates, manual corrections, an “eaten” state, search, and controls for the light, camera, and analysis automation.
That editing layer is not a decorative extra. The AI will misidentify, miss, or rename things. The card is what turns those mistakes into something you can fix rather than live with.
Step 1: Flash the ESP32-CAM with the fridge configuration
Start with the current fridge-core repository rather than copying an old ESPHome configuration from a forum post.
The supplied ESPHome file expects three secrets:
wifi_ssid: "Your_WiFi_Name"
wifi_password: "Your_WiFi_Password"
fridgecam_api_key: "Your_API_Encryption_Key"
Copy the repository’s current esphome-config.yaml into ESPHome, change the names under substitutions, add the secrets, and flash the board.
Do the first flash and test on the bench.
Once the ESP32-CAM joins Home Assistant, confirm that the camera feed, flashlight, and door sensor entities work before you put anything inside the refrigerator. If the camera is unreliable in open air beside your router, a large insulated metal appliance is unlikely to improve it.
Step 2: Wire the refrigerator door sensor
The reference configuration uses a simple magnetic reed switch.
Connect one wire to GPIO13 and the other to GND. The ESPHome configuration enables the ESP32’s internal pull-up, so this build does not require an external pull-up resistor.
Mount the magnet so it sits close to the switch when the refrigerator door is closed. When the door moves away, Home Assistant should report the binary sensor as open.
Test the state repeatedly before permanent mounting:
Door closed -> binary sensor off / closed
Door open   -> binary sensor on / open
If the logic appears backward, inspect the actual entity state and wiring before changing the automation. Two loose wires are much easier to diagnose on a desk than behind the butter.
Step 3: Find a camera position that can see the food
Camera placement will decide whether the rest of the build feels clever or irritating.
Open the live ESP32-CAM feed and experiment before attaching the board. Aim for the broadest unobstructed view of the shelves you actually use. Watch for the door blocking the frame, the onboard LED reflecting off shiny packaging, and tall items hiding everything behind them.
The stock configuration uses VGA resolution. That can be enough for a vision model to identify many ordinary foods and packages, but it cannot recover detail that never reached the sensor.
Drawers, opaque containers, door shelves, and products behind other products remain blind spots. The companion card lets you manually mark products as being in the freezer or side door for exactly this reason.

Step 4: Create the Home Assistant fridge inventory
Create a dedicated Home Assistant To-Do list, for example:
Fridge ContentsThen create this directory inside the Home Assistant configuration:
/config/www/fridge/The automation writes the latest snapshot here:
/config/www/fridge/fridge_latest.jpgHome Assistant exposes the same image to the dashboard under:
/local/fridge/fridge_latest.jpgDo not reuse a To-Do list that contains ordinary household tasks. The fridge automation stores machine-readable markers inside item descriptions so quantity, condition, confidence, notes, brands, and image coordinates survive between scans.
Step 5: Configure a vision-capable AI Task provider
The automation relies on Home Assistant’s AI Task layer. The refrigerator photograph is passed to an AI Task provider that can accept image attachments, and the response is then parsed by the automation.
The fridge project names Google Generative AI and OpenAI as examples of compatible providers. Pick a vision-capable provider and verify it independently before importing the refrigerator automation.
A simple test saves time. In Home Assistant, open the Actions developer tool, select AI Task: Generate data, attach a normal test image, and ask the model to describe what it contains. If that fails, fix the AI integration before you add the door trigger, camera snapshot, and inventory logic.
Cloud vision is the easiest first route, but it also means refrigerator photographs leave your Home Assistant server for inference.
Step 6: Import the fridge automation blueprint
The current fridge-core automation blueprint handles the door trigger, snapshot, AI analysis, parsing, and To-Do inventory update.
In Home Assistant, open:
Settings
→ Automations & scenes
→ Blueprints
→ Import blueprint
Import the automation.yaml file from fridge-core.
Then map its inputs to your entities:
Door Sensor   -> your ESP32-CAM door binary_sensor
Flashlight    -> your ESP32-CAM light
Camera        -> your ESP32-CAM camera entity
To-Do List    -> Fridge Contents
Leave the default snapshot delay alone for the first test. The current blueprint waits 2.435 seconds after switching on the light before taking the photograph.
The blueprint also has an Enable AI Detection switch. Turn it off and the door can still trigger a photograph and cycle the light without sending the image to the AI provider. That makes camera placement much easier to tune before every door opening starts an inference request.
Step 7: Install the optional fridge dashboard
The automation works without a custom dashboard, but fridge-card makes the inventory much easier to live with.
With HACS, open:
HACS
→ Frontend
→ Custom repositories
Add the fridge-card repository linked earlier as a Dashboard custom repository and install Fridge Card.
Then add the card to a Home Assistant dashboard. A typical configuration looks like this:
type: custom:fridge-card
title: Fridge
image_path: /local/fridge/fridge_latest.jpg
todo_entity: todo.fridge_contents
camera_entity: camera.fridge
light_entity: light.fridge
door_entity: binary_sensor.fridge_door
analyze_entity: automation.fridge_analysis
Use your actual entity names.
The card can preserve manual corrections instead of immediately replacing them with the model’s next guess. Edited quantity, condition, notes, brands, and hand-drawn detection frames can survive later scans when the item is still matched.
Step 8: Test with a deliberately simple refrigerator
Do not begin with a refrigerator packed to the hinges.
Put five visually different items in clear view. A carton of milk, a jar, a yogurt cup, an apple, and a bottle make a useful first test.
Close the door, let the camera and automation settle, then open it once. Check:
The door sensor changed state.
The light switched on.
fridge_latest.jpgwas replaced.The photograph shows the current contents clearly.
The AI Task ran successfully.
New items appeared in the To-Do list.
The dashboard shows the same items.
The light switched off afterward.
Now move two products, hide one behind another, and repeat the scan.
That second test is more useful than a perfect first scan. It shows whether the model keeps reasonably consistent names and whether the camera angle still works after normal refrigerator use rearranges the scene.
Why refrigerator inventory is harder than object recognition
A photograph of one apple against a clean background is an easy vision task. A refrigerator is visual clutter with mediocre lighting and lots of occlusion.
The model has to handle partial labels, reflections, duplicate packaging, transparent bags, similar containers, odd viewing angles, and products covering each other. Then it has to decide whether “strawberry yogurt” in today’s image is the same “strawberry yogurt” recorded yesterday.
The fridge-core automation tries to help by giving the AI names and previous approximate locations from earlier scans. The project correctly treats this as a hint. Each analysis is still a fresh request rather than persistent model training or memory.
There is another deliberate choice in the automation. If an item disappears from one image, fridge-core leaves the existing inventory record alone. The user removes it manually or marks it eaten.
That prevents a hidden jar from being declared consumed because somebody placed a carton in front of it. The tradeoff is stale inventory when nobody corrects the list. One camera cannot cleanly solve both problems.
Common errors and fixes
▪ The snapshot exists, but recognition is poor
Inspect the photograph before you touch the AI prompt. If labels are unreadable, glare covers half the shelf, or products occupy a handful of pixels, changing the model will not restore missing visual information.
Improve the camera angle and lighting first.
▪ The automation runs, but no photograph appears
Confirm that /config/www/fridge/ exists and that the camera entity works independently. Then manually call the camera snapshot action and verify that fridge_latest.jpg changes.
Treat a failed camera as a camera problem first, not an AI problem.
▪ The AI action fails
Run ai_task.generate_data manually with the same AI Task entity and a simple image attachment. Confirm that the selected provider accepts vision input and attachments.
If you use a paid cloud provider, also check its API billing and usage limits.
▪ The whole inventory suddenly duplicates
There is a current project bug worth knowing before you trust the list. As of October 10, 2026, fridge-core issue #15 remains open and documents how a failed todo.get_items call can cause recognized items to be added as duplicates.
If you suddenly get a second copy of most or all of the refrigerator contents after a Home Assistant hiccup, inspect that failure mode before changing the vision model.
▪ The camera works on the bench but becomes unreliable in the refrigerator
Test Wi-Fi strength with the refrigerator door closed and the camera in its intended position. A refrigerator can be a much less friendly radio environment than the counter beside it.
Inspect the power cable and connector too. Do not defeat the door seal just to rescue a bad mounting position.
Privacy and account risk with cloud fridge vision
A refrigerator photograph can expose more household information than it first appears to.
The frame may contain product brands, medicine, alcohol, dietary products, children’s food, labels containing names, and parts of the surrounding kitchen. If the vision provider is cloud-based, those images leave your Home Assistant server for inference.
Check the privacy and data-use terms of the AI Task provider you choose. Keep API credentials in Home Assistant’s secrets system rather than pasting them into public YAML, screenshots, GitHub issues, or support posts.
The ESP32, door detection, snapshot storage, To-Do list, and dashboard can all remain under your control. The vision provider is the part that decides whether the full recognition workflow stays local.
Can the AI fridge camera run fully locally?
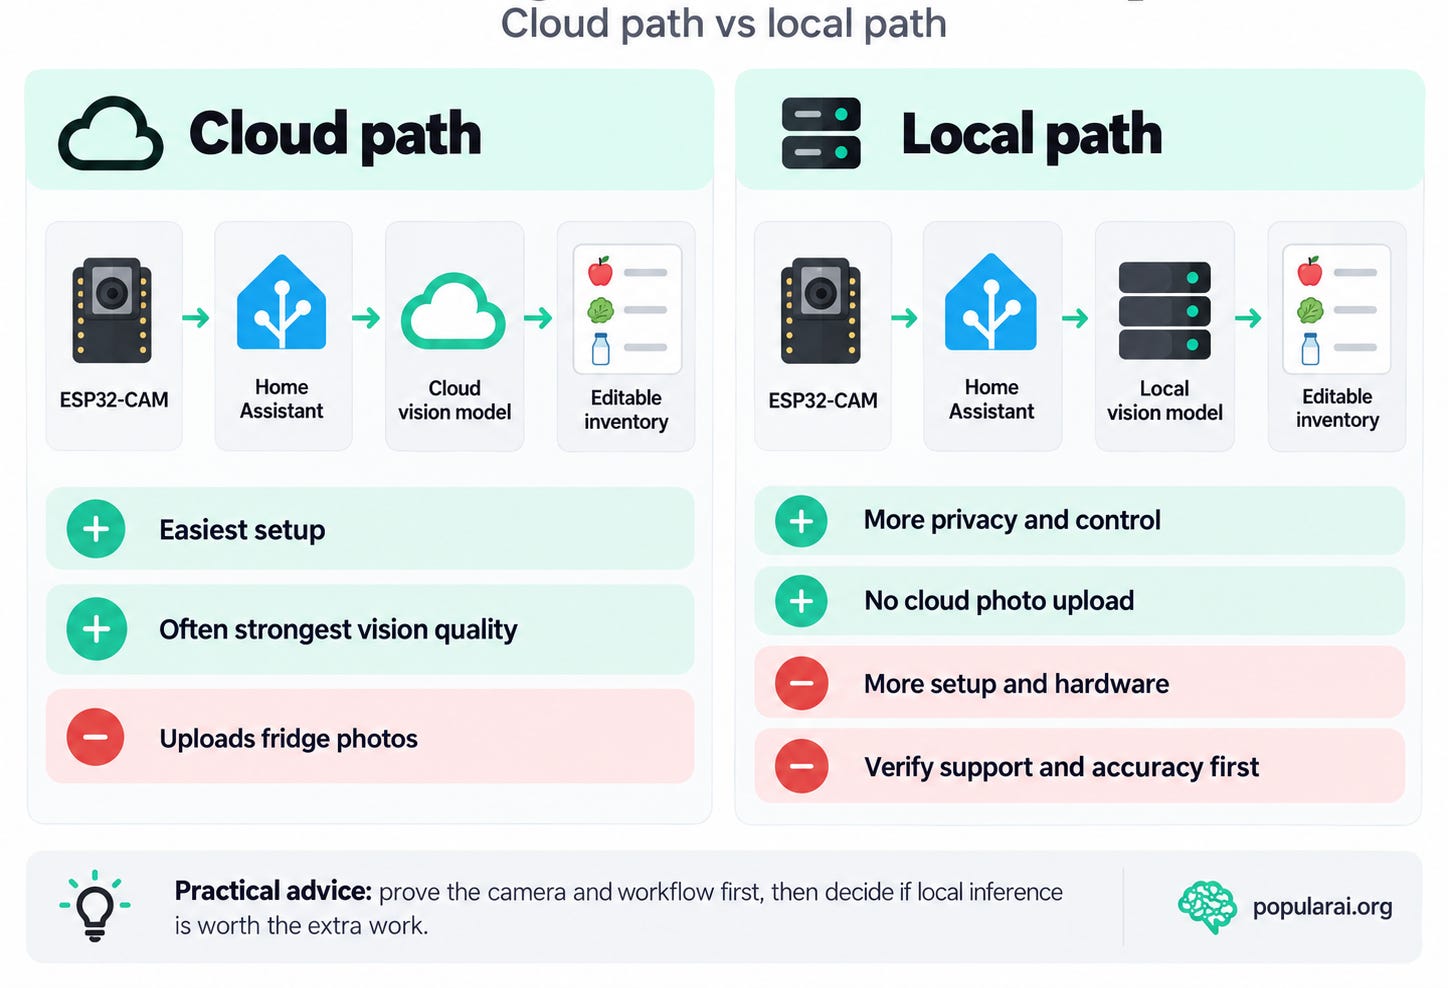
There is a plausible local route, but it deserves testing on the exact Home Assistant release and model you plan to use.
Home Assistant’s current development code includes an Ollama AI Task implementation with generated-data and attachment support. In principle, that gives this refrigerator workflow a route to a local vision model.


Three practical questions still need answers on your hardware: whether the Ollama AI Task subentry is available in the Home Assistant release you are running, whether your chosen local model accepts the image correctly, and whether its recognition is useful on cluttered refrigerator photographs.
The last one can be expensive. Local inference does not improve a weak camera angle, and a small vision model does not gain the ability to identify products hidden behind other products.

If you already run Ollama, Popular AI’s private Home Assistant voice assistant guide covers the Home Assistant and network side of connecting a local model. The local LLM VRAM guide is a better place to start before buying a GPU specifically for local multimodal inference.
Cloud vision is the sensible first build. Prove the camera, door trigger, and inventory logic before you spend money or time replacing the inference layer.
Final DIY AI fridge camera checklist
ESP32-CAM works reliably before permanent mounting.
Reed switch reports the door correctly.
Camera still connects with the refrigerator door closed.
Electronics and wiring are protected from moisture and mechanical damage.
/config/www/fridge/exists.A dedicated Fridge Contents To-Do list exists.
The selected AI Task provider successfully analyzes an image.
The fridge-core blueprint is mapped to the correct entities.
Opening the door creates a fresh snapshot.
AI results appear in the inventory.
Manual corrections survive later scans.
The light switches off after analysis.
Hidden or removed items are checked manually.
API and privacy settings have been reviewed if cloud vision is used.
The open duplicate-inventory bug is understood before relying on the list.
Is a DIY AI fridge camera worth building?
Yes, if you want a Home Assistant project that turns modern vision models into something visible and useful around the house without pretending the result is perfect.
Taking the picture is easy. Identifying obvious objects is often straightforward. Maintaining a correct inventory while products move, overlap, disappear behind each other, and return to view is where the build gets difficult.
That is why this setup works best as an editable assistant rather than an autonomous record keeper. The dashboard, manual corrections, and conservative handling of missing items are part of the design, not cleanup for an otherwise automatic system.
Start with five products and cloud vision. Get the photograph, door trigger, AI Task call, and inventory update working reliably. Use it under normal refrigerator conditions for a while. If correcting the list takes more effort than the system saves, you have your answer. If the inventory earns its place in your routine, local vision is the next experiment.
Explore more from Popular AI:
Start here | Local AI | Builds & gear | Autonomy & policy | Fixes & guides | Popular AI podcast
If Home Assistant could keep a live AI inventory of your fridge, what would you want it to track first: what’s running low, expiration dates, or meal ideas?