


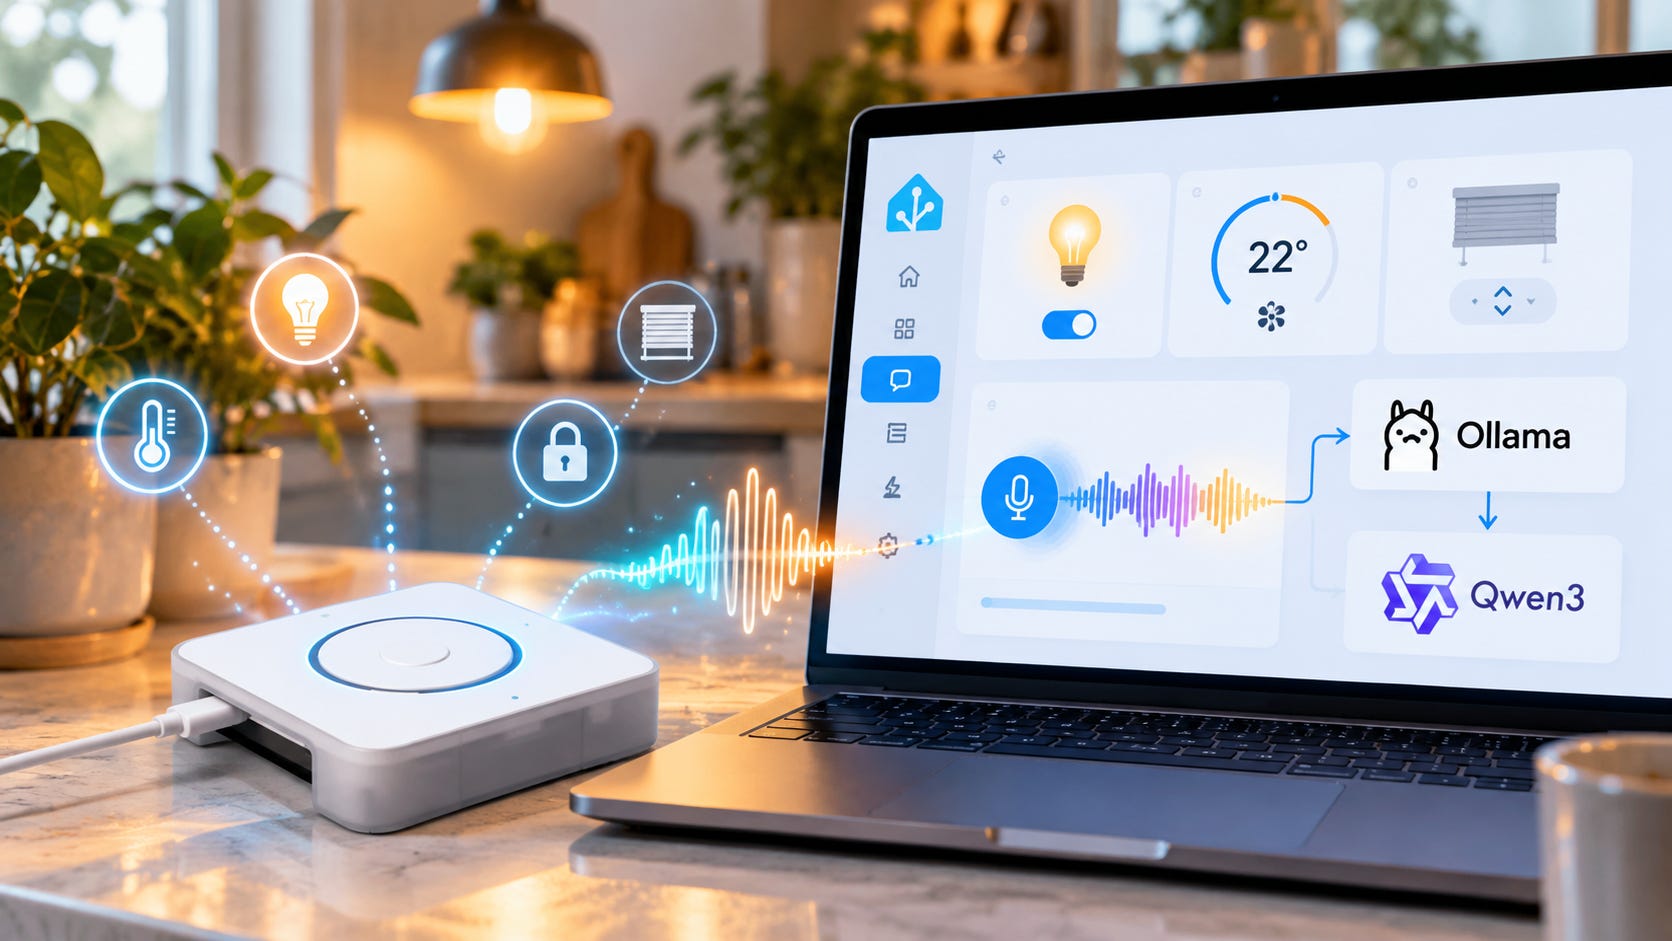
You can build a local Alexa alternative that controls your smart home without sending routine speech or AI requests to a cloud service. Home Assistant handles the devices. Whisper turns speech into text, Piper speaks the answers, and Ollama runs a local LLM for requests that need more flexible language understanding.
The useful trick is to keep the LLM out of the way until it is needed. A command such as “turn off the kitchen lights” should go straight through Home Assistant’s built-in conversation agent. A less literal request, such as “It’s dark in the kitchen,” can fall back to a local model.
That gives you a faster, more predictable private voice assistant, with fewer services outside your control. You can test most of the setup with a phone before buying a dedicated microphone or GPU.
Quick answer: The local Alexa alternative to build
Use a Home Assistant Assist pipeline with local speech recognition and speech synthesis, then configure Ollama as the fallback conversation agent.
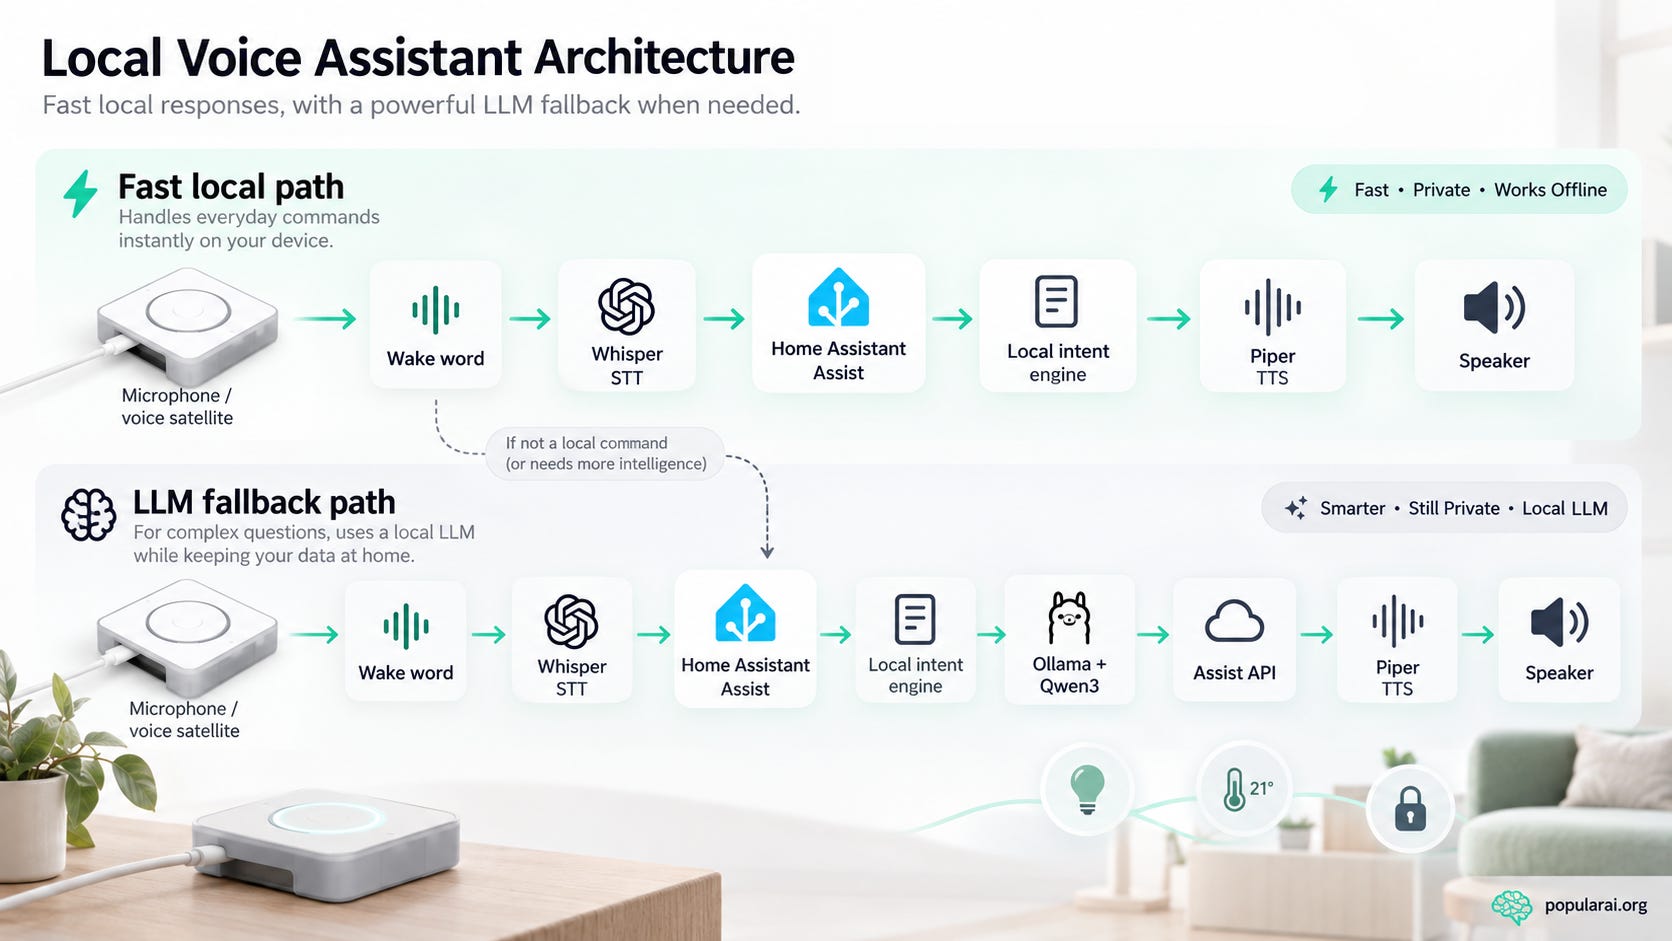
The Home Assistant Assist-first architecture tries deterministic commands locally before passing unfamiliar requests to the LLM. You get direct device control for the commands Home Assistant already understands, without asking a language model to reason through every light switch.
The fast local path handles everyday commands instantly on your device, moving from microphone / voice satellite to wake word, Whisper STT, Home Assistant Assist, the local intent engine, Piper TTS, and your speaker.
If a command is not local (or needs more intelligence), the LLM fallback path handles complex questions using a Local LLM while keeping your data at home, routing through Ollama + Qwen3, the Assist API, Piper TTS, and the speaker for a smarter, still private setup that can control smart-home devices.
For an open-ended assistant, choose Whisper rather than Speech-to-Phrase. Speech-to-Phrase is much faster on low-powered hardware, but it only recognizes supported command patterns. It cannot transcribe arbitrary speech for an LLM fallback. That limitation becomes obvious the first time someone asks a question outside its expected phrases.
Start with Qwen3 8B in Ollama. The Qwen3 8B package is about 5.2GB and supports tool calling, which Home Assistant needs to let the model interact with its Assist API. It is a starting point, not a promise that every command will be interpreted correctly.
A large GPU is optional. A responsive voice pipeline and carefully chosen device permissions will do more for the experience than a huge model running slowly.
Who should build this, and who can skip the LLM
This guide is for people already running Home Assistant, or willing to make it the control point for their smart-home devices. You should be comfortable adding integrations, reading a local IP address, running a few Ollama commands, and checking whether one machine can reach another over your network.
Home Assistant OS is the simplest starting point. It lets you install Whisper, Piper, and openWakeWord as Home Assistant apps. A Home Assistant Container installation can use the same approach, but you will need to run the speech and wake-word services separately. The Wyoming integration connects external local voice services, including Whisper, Piper, Speech-to-Phrase, and compatible wake-word engines.
You don’t need to train a model or build an AI agent from scratch. Home Assistant already exposes a conversation system, voice pipelines, and a way for supported LLMs to call smart-home tools.
You may not need Ollama at all. If the entire requirement is to switch lights, change a thermostat, or ask for a sensor reading using commands Assist already supports, use the built-in local agent. It requires less computing power and eliminates a whole category of model errors.
The LLM becomes worthwhile when you want flexible wording, follow-up questions, and requests that don’t fit fixed commands. Keep that difference in mind while testing, because the best-performing part of this build is often the part that never touches AI inference.
What hardware you actually need
The project has two computing jobs. Home Assistant runs the smart home and voice pipeline. Ollama runs the model. They can share a machine, but keeping them separate makes it easier to see which component is slow and avoids making your smart-home server compete with AI inference for resources.
For fully local Whisper speech recognition, an Intel N100-class machine is a sensible starting point. Home Assistant’s local voice setup guide reports about 8 seconds for Whisper on a Raspberry Pi 4 and under a second on an Intel NUC. Those are published examples, not latency measurements from this build. They still show why the speech-recognition computer deserves attention before you spend money on a larger LLM.
Ollama can run on another Linux, Windows, or macOS computer on the same LAN. An 8GB-class GPU gives you room to experiment with quantized models in the 4B to 8B range, though fitting the model file in VRAM does not guarantee that the context window and runtime overhead will fit comfortably too. The Qwen3 model-size listings put the default 4B, 8B, and 14B packages at roughly 2.5GB, 5.2GB, and 9.3GB.
A 24GB GPU such as an RTX 3090 gives you more freedom to run larger local models, but it is an expensive way to operate a kitchen lamp. If you already have an RTX 3090, the 24GB local LLM guide explains which models fit. The broader AI PC buying guide covers mini PCs, unified-memory machines, and GPU workstations. If this voice project is your only reason to buy dedicated AI hardware, the local AI hardware buying analysis is a useful reality check.
For input and output, start with the Home Assistant phone app. It is a cheap way to find out whether Whisper, Piper, and Ollama work together before introducing the acoustics and wake-word behavior of a room device.
If you want a dedicated unit, the Home Assistant Voice Preview Edition is the straightforward option. Its official hardware specification lists dual microphones, dedicated audio processing, a speaker, a hardware microphone cutoff switch, and ESPHome firmware. The listed recommended price is $69 in the U.S. or €59 in Europe, with retailer and regional differences. Its built-in wake-word handling also means the openWakeWord server setup below is not required for every Voice Preview Edition deployment.


Buy the voice endpoint before buying a GPU solely for this project. People notice a missed wake word long before they appreciate another few billion model parameters.
More on local AI hardware:


Step 1: Get Whisper and Piper working before adding Ollama
Build the speech pipeline first. When the LLM is added too early, a failed request could be caused by the microphone, speech transcription, device names, Ollama networking, exposed entities, or model tool calling. Separating those tests saves a lot of guesswork.
On Home Assistant OS, use this sequence:
Open Settings → Apps.
Install Whisper.
Install Piper.
Start both apps.
Open Settings → Devices & services.
Home Assistant should discover the corresponding Wyoming services.
Add the Whisper and Piper integrations.
Open Settings → Voice assistants.
Create a voice assistant or edit an existing one.
Select Whisper as speech-to-text.
Select Piper as text-to-speech.
The result should be a voice pipeline in which the captured audio can be transcribed locally and the response can be synthesized locally. You do not need Ollama for that first test.
Now expose a small number of ordinary devices to Assist. A useful initial group is:
Kitchen lights
Office lamp
Living-room fan
One temperature sensor
Keep locks, alarms, garage doors, and expensive or dangerous controls out of the test. When the assistant is still making basic mistakes, giving it more powerful tools makes diagnosis harder and raises the cost of a wrong command.
Try a simple request:
Turn on the office lamp.Then reverse it:
Turn the office lamp off.Check that the actual lamp changes state, not merely that Home Assistant produces a reassuring spoken sentence. If either command fails, fix the device name, entity exposure, or local Assist configuration now. Ollama will only make a broken foundation harder to troubleshoot.
Step 2: Add a wake word when the speech pipeline works
Push-to-talk in the Home Assistant app is enough for initial testing. It removes wake-word detection from the equation and lets you concentrate on speech transcription and device control.
For a compatible voice satellite that streams audio to Home Assistant, install openWakeWord through Settings → Apps → openWakeWord. Start the app, add the discovered Wyoming integration, and choose the wake-word engine in Settings → Voice assistants. The official openWakeWord procedure walks through the streaming wake-word selection.
Dedicated voice hardware may detect its wake word on the device instead. Use the method appropriate to your satellite rather than installing components simply because they appear in a diagram.
Once the stack responds reliably to a button press, test it across normal speaking distances, with music playing, and with other people in the room. Wake-word reliability depends on the microphone and the room as well as the software. A voice assistant that only wakes up when you stand over it isn’t much use.
Step 3: Install Ollama and check that the model runs
Install Ollama on the computer you intend to use for inference. It supports Linux, Windows, and macOS, and the official Ollama installers are preferable to older platform-specific instructions copied from a tutorial.
Pull the model:
ollama pull qwen3:8bStart a test conversation:
ollama run qwen3:8bAsk an ordinary question. You’re checking that the model is installed and can answer, not that it already knows anything about the state of your house.
Exit the interactive session and inspect where the model is running:
ollama psThis is useful because an apparent GPU setup can still end up doing some or all of its work on the CPU. A model responding correctly is not enough if it takes so long that nobody wants to talk to it.
If Ollama feels slow here, record that before involving Home Assistant. Later, you’ll be able to tell whether delays are coming from speech recognition or the model itself.
Step 4: Let Home Assistant reach Ollama without exposing it publicly
By default, Ollama listens on 127.0.0.1:11434. That address accepts connections from the Ollama computer itself, but a Home Assistant host on another machine won’t be able to use it.
On a dedicated Linux Ollama host using systemd, open the service override:
sudo systemctl edit ollama.serviceThis opens an editor. There, add the following settings:
[Service]
Environment="OLLAMA_HOST=0.0.0.0:11434"
Environment="OLLAMA_NO_CLOUD=1"
Reload and restart the service:
sudo systemctl daemon-reload
sudo systemctl restart ollama
OLLAMA_HOST changes which interfaces the server listens on. OLLAMA_NO_CLOUD=1 disables Ollama’s cloud features, including cloud models and web search. Ollama’s server configuration and privacy FAQ explains both environment variables, as well as the different ways macOS and Windows handle persistent environment settings.
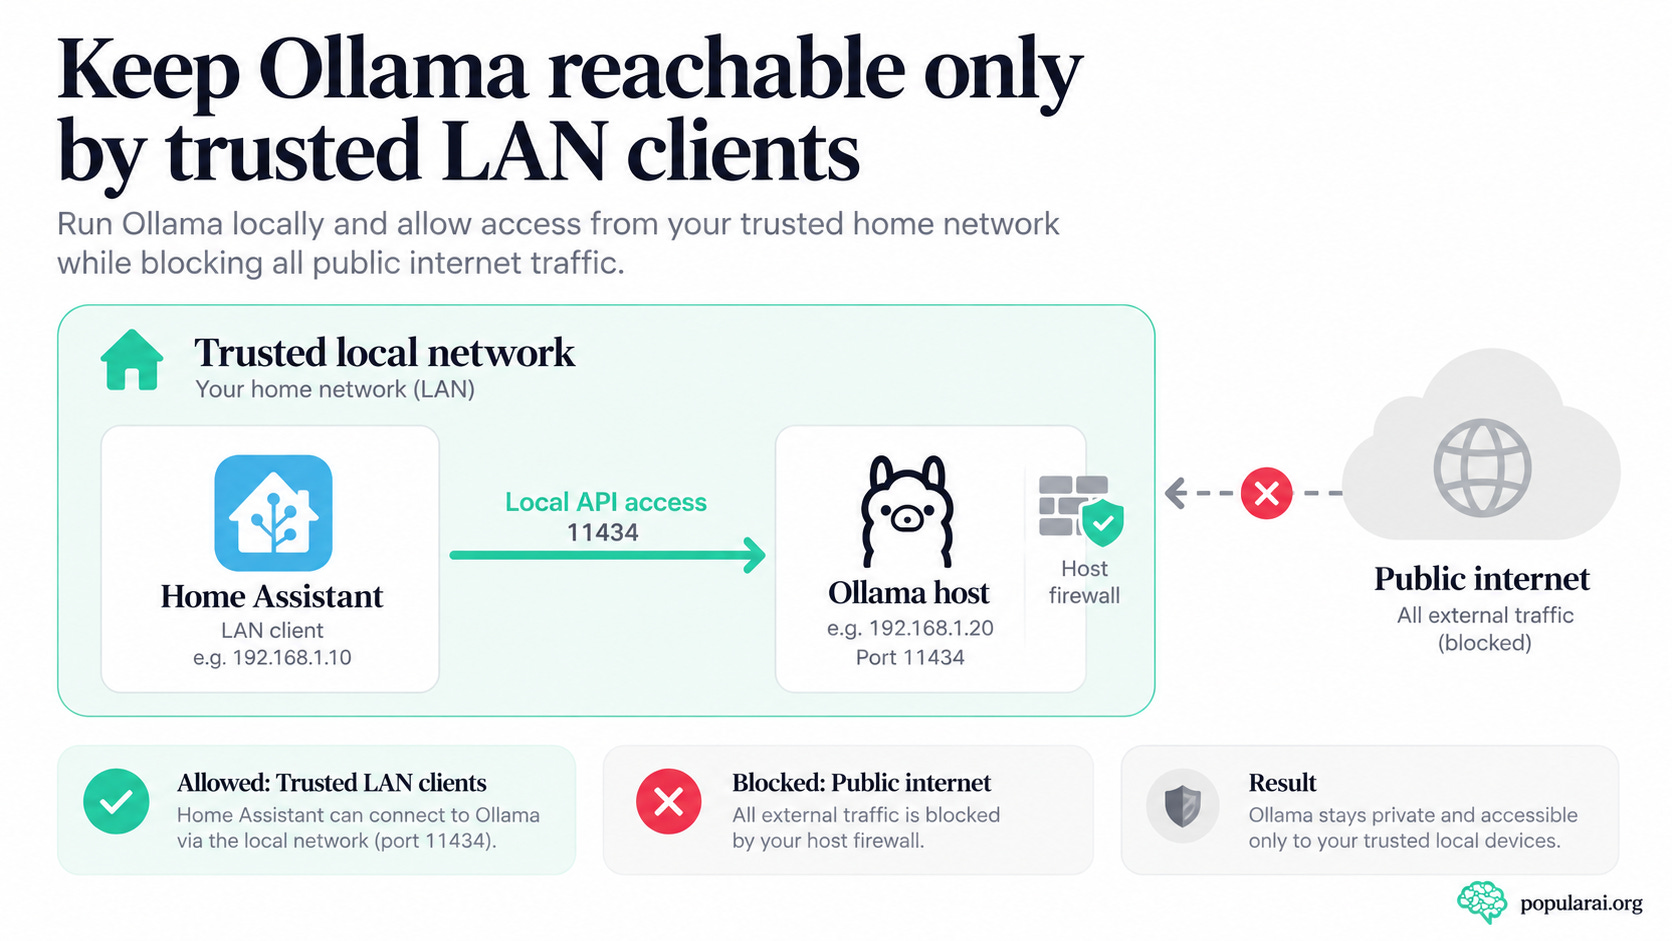
Do not port-forward port 11434 to the public internet. Binding the server to 0.0.0.0 makes it accessible on available interfaces, which is broader access than this project needs. Restrict the port with the host firewall or a segmented local network so only Home Assistant and other trusted clients can reach it.
This is one of the few places where convenience can quietly undo the privacy benefit. A local model isn’t private if its API is available to machines you don’t trust.
On Windows or macOS, use Ollama’s own platform instructions for setting persistent variables. The Linux systemd commands above are not portable.
Step 5: Connect the Ollama conversation agent to Home Assistant
Now connect Home Assistant to the running model. Open the Ollama integration and set it up with the address of the machine hosting the API.
Open Settings → Devices & services.
Choose Add integration.
Search for Ollama.
Enter the server’s LAN address, for example:
http://192.168.1.50:11434Choose
qwen3:8bas the model.Enable Control Home Assistant.
Begin with an 8K context window.
Leave Think before responding disabled.
Keep conversation history short at first.
Keep the model loaded if the machine is dedicated to voice.
The Home Assistant Ollama integration exposes settings for context size, history, keep-alive, and thinking. Its 8K context default is a reasonable place to begin, while disabling thinking avoids adding extra response time to everyday speech. Increasing the context window can use more memory, and retaining excessive conversation history can make a small model less predictable.
Home Assistant describes AI control through this integration as experimental. It recommends exposing fewer than 25 entities while experimenting with local LLMs, and warns that smaller models can make more mistakes. Those limits are worth respecting even if your home contains far more devices.
The model doesn’t need every battery sensor, holiday plug, firmware-update button, and half-forgotten test entity. Give it the handful of devices people actually intend to control by voice.
Step 6: Send easy commands through Assist before the LLM
The local fast path is the part that makes this build tolerable as a daily voice assistant.
In Settings → Voice assistants, edit the assistant using the Ollama conversation agent and enable Prefer handling commands locally, if the option is not already enabled. Home Assistant introduced local command handling ahead of LLM fallback to avoid unnecessary model processing for commands its own intent engine understands.
Now “turn on the kitchen light” can be handled directly by Assist. A less literal request such as “It’s dark in the kitchen, can you help?” is more likely to reach the model, which can decide whether a light-control tool is appropriate. Home Assistant has documented this mixed Assist and AI behavior as a way to combine predictable controls with more flexible requests.
This setup isn’t a guarantee that every short sentence will take the fast path. Language coverage, device exposure, and the exact sentence still affect what the built-in agent understands.
It does mean you stop spending LLM inference time on commands that a simpler system can resolve immediately. That’s the right way to use a local model whose response speed is limited by your own hardware.
Step 7: Get the ready-to-paste Home Assistant voice prompt
Paid subscribers get the complete Ollama prompt used to keep spoken replies short, handle ambiguity, work with Home Assistant tools, and avoid false confirmations, plus the device-naming and testing notes that make it more reliable.
Subscribe or upgrade to a paid subscription to unlock this section.
Step 8: Test the built-in and LLM paths separately
Start with something Home Assistant should recognize:
Turn on the kitchen light.Watch the light and check that the command works promptly. When your language and setup support it, the built-in intent engine should handle this without Ollama doing the interpretation.
Now choose a more open-ended phrase:
It’s dark in the kitchen. Can you do something about it?That request is more likely to reach the LLM. If nothing happens, inspect the Ollama connection, the tool-capable model, and whether the kitchen light is exposed to Assist before rewriting the prompt.
Next, test conversational context:
Turn on the office lamp.Follow with:
Make it dimmer.Since early 2025, Home Assistant has shared conversation history between built-in Assist handling and an LLM fallback. This can help follow-up commands refer to what happened on the previous turn. It doesn’t eliminate mistakes, particularly if several similar entities are exposed.
Finally, test the permission boundary:
Unlock the front door.If you have never exposed the lock to Assist, the LLM should have no Home Assistant tool permission to unlock it. Do not add it just to make that test pass. The refusal or inability to act is the expected result.
Repeat these tests before adding more rooms. A four-device assistant that works is a better starting point than a whole-house assistant that sometimes confuses lamps and locks.
Step 9: Measure latency before switching models
Voice speed is made of separate delays. A slow response could come from wake-word detection, Whisper, local intent processing, the LLM, or Piper. Replacing Qwen3 will not fix a microphone or transcription bottleneck.
Repeat the same commands at least 10 times and record the stages. Use the same format each time:
Wake word → transcription complete
Transcription → action starts
Action → first spoken response
Total wake word → first spoken response
Test the model both warm and cold. A dedicated inference machine can keep a model resident in memory, while a shared machine may unload it between requests. The first prompt after a cold start can feel quite different from a prompt sent moments later.
Home Assistant’s published Whisper comparison shows the scale of the speech-recognition problem: around 8 seconds on a Raspberry Pi 4 versus under a second on an Intel NUC. Hardware, model selection, language, and audio length will change the actual result.
Streaming also affects perceived speech latency. In one published Home Assistant demonstration, Gemma 3 4B on an RTX 3090 with Piper on an i5 began speaking after 0.56 seconds with streaming, compared with 5.31 seconds without it. That is a reported demonstration, not a benchmark for Qwen3 8B or a guarantee for your equipment.


If a plain light command takes several seconds, inspect the fast-path configuration and transcription timing first. If only LLM fallback requests are sluggish, reduce model size, disable thinking, or look for cold-start delays before considering a hardware upgrade.
Which local LLM is a good fit for Home Assistant voice?
▪ Qwen3 8B is the default starting point because it gives you a practical test of tool calling without demanding the hardware budget of a much larger model. Ollama lists Qwen3 as a tool-capable model family, which is a requirement when the model needs to control exposed entities rather than merely chat.
▪ If inference is too slow, try Qwen3 4B. Its default package is about 2.5GB, and the smaller footprint may help on modest hardware. The tradeoff is more room for incorrect tool choices, lost context, and misunderstood device requests.
▪ If the 8B model runs quickly but regularly fails at phrasing that should be within its capabilities, Qwen3 14B is an upgrade to test. The default package is roughly 9.3GB before additional runtime and context requirements. Larger models don’t make sense unless the latency and available memory support them.
A simple way to think about the choices:
Qwen3 4B    → low-end experiment
Qwen3 8B    → default starting point
Qwen3 14B   → quality upgrade if latency remains acceptable
24B+        → only when you have another reason to run larger local models
The model that gives the richest answer after 15 seconds may be excellent for document analysis and terrible for turning on a lamp. Choose for the voice workload, not for the largest parameter count your machine can technically load.
Home LLM and Local_LLHAMA: More specialized alternatives
Ollama’s general-purpose models are not your only option. The community Home LLM project provides a custom Home Assistant integration and smart-home-oriented models. Its repository includes a 3B Llama 3.2 model and a 270M FunctionGemma model, plus support for Ollama, llama.cpp, and OpenAI-compatible backends.
The attraction is focus. A smaller model trained around smart-home commands may be worth testing when your main requirement is translating household speech into device actions, rather than answering broad questions.
The cost is maintenance. You now depend on a custom integration and its release schedule, in addition to Home Assistant and Ollama. A specific problem with the native setup is a much better reason to add Home LLM than curiosity alone.
Another project, Local_LLHAMA, inserts more orchestration between Home Assistant and Ollama. Its author describes hardware presets across 8GB to 32GB of VRAM, routing for multiple intents, Whisper, Piper, openWakeWord, memory backed by PostgreSQL, and optional external services. It is a heavier platform with more moving parts to configure and maintain.
For an ordinary private Alexa replacement, begin with the official Home Assistant integration. You can add specialized middleware later if you need complex multi-command behavior and are prepared to maintain the extra services.
Common errors and fixes
▪ Home Assistant cannot connect to Ollama
If Home Assistant reports a connection failure, Ollama may still be listening only on 127.0.0.1, the host firewall may be blocking the port, or the configured IP address may be wrong.
Check the Ollama host binding and restart the service after changing its environment settings. Test the API from another trusted machine on the LAN. If the model works locally but the Home Assistant computer can’t connect, concentrate on the network path before changing models.
Do not expose the API to the internet to get around the firewall. The fix should grant the Home Assistant machine access, not every machine on the internet.
▪ The model cannot control smart-home devices
The Ollama conversation can work while device control fails. One likely cause is a model without tool-calling support. Another is that Control Home Assistant wasn’t enabled in the integration.
Use a tool-capable model and confirm that it is selected in Home Assistant. Ollama’s tool-calling examples explain how tool-capable models return actions. Imported GGUF models can need additional checking of their capabilities.
Keep conversational quality and tool reliability separate in your testing. A model that answers general questions fluently may still be poor at choosing the correct light or switch.
▪ The LLM cannot see a device
If a model knows the kitchen light exists only because you mentioned it in the prompt, that does not grant access to it. Home Assistant exposes a controlled set of entities to Assist, and the Ollama integration can only operate within that set.
Open the exposed-entities settings and check the target device deliberately. Confirm the entity name and area, then retry the command. Resist the temptation to expose every device as a shortcut, especially security and access-control entities.
If a particular device is unreliable, test it first with Home Assistant’s built-in Assist commands. That separates an ordinary integration or naming problem from LLM behavior.
▪ Simple commands keep reaching the LLM
This usually means the phrasing doesn’t match built-in intent coverage, the language lacks a matching sentence, or Prefer handling commands locally isn’t configured as expected.
Verify the assistant’s local-handling preference and try a standard command such as “turn on the kitchen light.” Compare it with your original wording. Use Home Assistant’s Assist developer tools to see whether the deterministic agent understands the request.
Some requests will still need the model. The goal is to keep common supported commands local, not to force every natural-language sentence through a fixed command parser.
▪ Open-ended speech never reaches Ollama
Check which speech-to-text engine the pipeline uses. Speech-to-Phrase works well for supported home-control phrases but cannot transcribe arbitrary questions for an LLM to interpret.

Select Whisper for open-ended speech, then test a sentence that isn’t a built-in smart-home command. If Whisper transcribes it correctly but Ollama never receives it, inspect the configured conversation agent and fallback preference next.
This is one of the easiest problems to mistake for a broken LLM. The model cannot interpret words that the speech engine never produces.
▪ Voice responses take too long
Check the stages before buying new hardware. A smaller LLM may reduce inference delay, but it won’t make slow Whisper transcription faster. Disabling thinking, starting with an 8K context window, keeping conversation history short, and holding the model in memory can also reduce unnecessary work.
For slow speech output, distinguish the time until the action happens from the time until Piper starts talking. You may already have responsive device control with a delayed spoken confirmation.
Change one setting at a time and repeat the same test commands. Otherwise, a lucky fast run can make a bad configuration look fixed.
Privacy and security: What stays inside your home?
When configured entirely locally, the microphone audio, speech transcription, smart-home state, model inference, and synthesized speech can stay on your home network. Home Assistant’s local voice system is designed around that possibility, while Ollama says it does not receive your prompts or answers when inference runs locally.
The boundary is only as good as the components attached to it. If you enable cloud models, hosted speech services, web search, third-party integrations, remote access, or external MCP servers, those services may create outbound data paths. Disabling Ollama cloud features is useful, but it doesn’t disable every other network service in Home Assistant.
The exposed-entity list is another security boundary. Five harmless lights give an imperfect model fewer opportunities to cause trouble than a toolset containing locks, alarms, cameras, garage doors, scripts, and administrative controls.
Treat permission changes as deliberate decisions. Add devices only when a real use case needs them, test the new commands, and watch the actual Home Assistant state. The model should not get access merely because an entity exists.
Can this really replace Alexa?
For local control of lights, switches, supported timers, sensor queries, automations, and basic spoken interaction, the Home Assistant approach is increasingly practical. Its Assist platform supports phones, dedicated voice hardware, ESPHome satellites, local speech tools, and LLM conversation agents.
It is less automatic as a drop-in replacement for everything Alexa does. Home Assistant’s built-in intent coverage varies by language, and unrestricted speech uses more computing power than fixed phrases. The local assistant also relies on the integrations and services you choose to set up. Music services, shopping workflows, and other cloud-assistant habits do not automatically appear when you install Ollama.
The demand is real. In one Home Assistant community discussion about an Ollama-powered voice interface, the project started from a desire to avoid cloud voice assistants, while other users pointed to features that already exist in Assist.
That exchange captures the useful change. You no longer need to invent the entire voice-assistant stack. You need to make the built-in pieces responsive enough that everyone in the house can use them without knowing which component handled a request.
Final checklist before using it throughout the house
Whisper transcribes ordinary speech locally.
Piper speaks Home Assistant responses locally.
A phone or voice satellite can start an Assist conversation.
The wake word works reliably if one is enabled.
Ordinary light and switch commands use Home Assistant’s fast local agent.
Ollama is reachable only from trusted machines on the LAN.
Qwen3 8B can make Home Assistant tool calls.
Fewer than 25 useful entities are exposed during initial LLM testing.
Locks, alarms, and other high-risk controls stay unexposed unless deliberately approved.
Thinking is disabled for the voice model.
The context window starts around 8K rather than an enormous maximum.
The LLM is the fallback for requests the built-in agent can’t handle.
Warm and cold latency have been measured separately.
Ollama cloud features are disabled when local-only inference is the goal.
The checklist is intentionally conservative. You can give the assistant more scope later. Starting with limited permissions makes it easier to identify which change introduced a new problem.
Build the fast Home Assistant voice assistant first, then expand it
The most useful private Alexa alternative puts Home Assistant in charge of the ordinary commands. Whisper handles unrestricted speech, Assist resolves the supported intents, Ollama interprets the requests that need more flexibility, and Piper speaks the result.
Start with your phone and four harmless entities. Prove that the lights respond reliably, then measure the difference between the built-in path and the LLM fallback. Only after those tests should you add room hardware, more devices, or a larger model.
If the local LLM is the bottleneck, the next question is whether a smaller model would do the job better or whether your existing machine has enough memory headroom for an upgrade. Popular AI’s guide to choosing local LLMs by 8GB, 12GB, and 24GB of VRAM helps with that decision.
A voice assistant earns its place when it responds promptly, changes the right device, and doesn’t need you to explain how it works. Build toward that standard rather than a bigger model specification.
More on choosing the right local AI hardware:

Explore more from Popular AI:
Start here | Local AI | Builds & gear | Autonomy & policy | Fixes & guides | Popular AI podcast
Would you replace Alexa with a local Home Assistant + Ollama setup, or is convenience still more important than privacy and control?