


Four triple-slot RTX 3090 cards will not fit directly into a normal eight-slot workstation or 4U case. The cards occupy roughly twelve rear expansion-slot positions before you account for airflow, power-cable bends, riser routing, and mechanical support.
The easiest professional solution is a Netstor NA265A-G4 GPU expansion chassis built for up to four triple-width PCIe cards. It combines the GPU mounting, front-to-back cooling, internal power supply, PCIe switching backplane, host adapter, and external cabling in one 4U enclosure. The host computer needs only one suitable PCIe Gen4 or Gen5 x16 slot.
The Netstor is the closest thing to a ready-made answer for four thick RTX 3090 cards. The catch is its specialist-hardware price, one shared PCIe 4.0 x16 host connection, and a published card limit of 320mm long and 130mm high. Some triple-slot RTX 3090 models fit that envelope. Others do not.
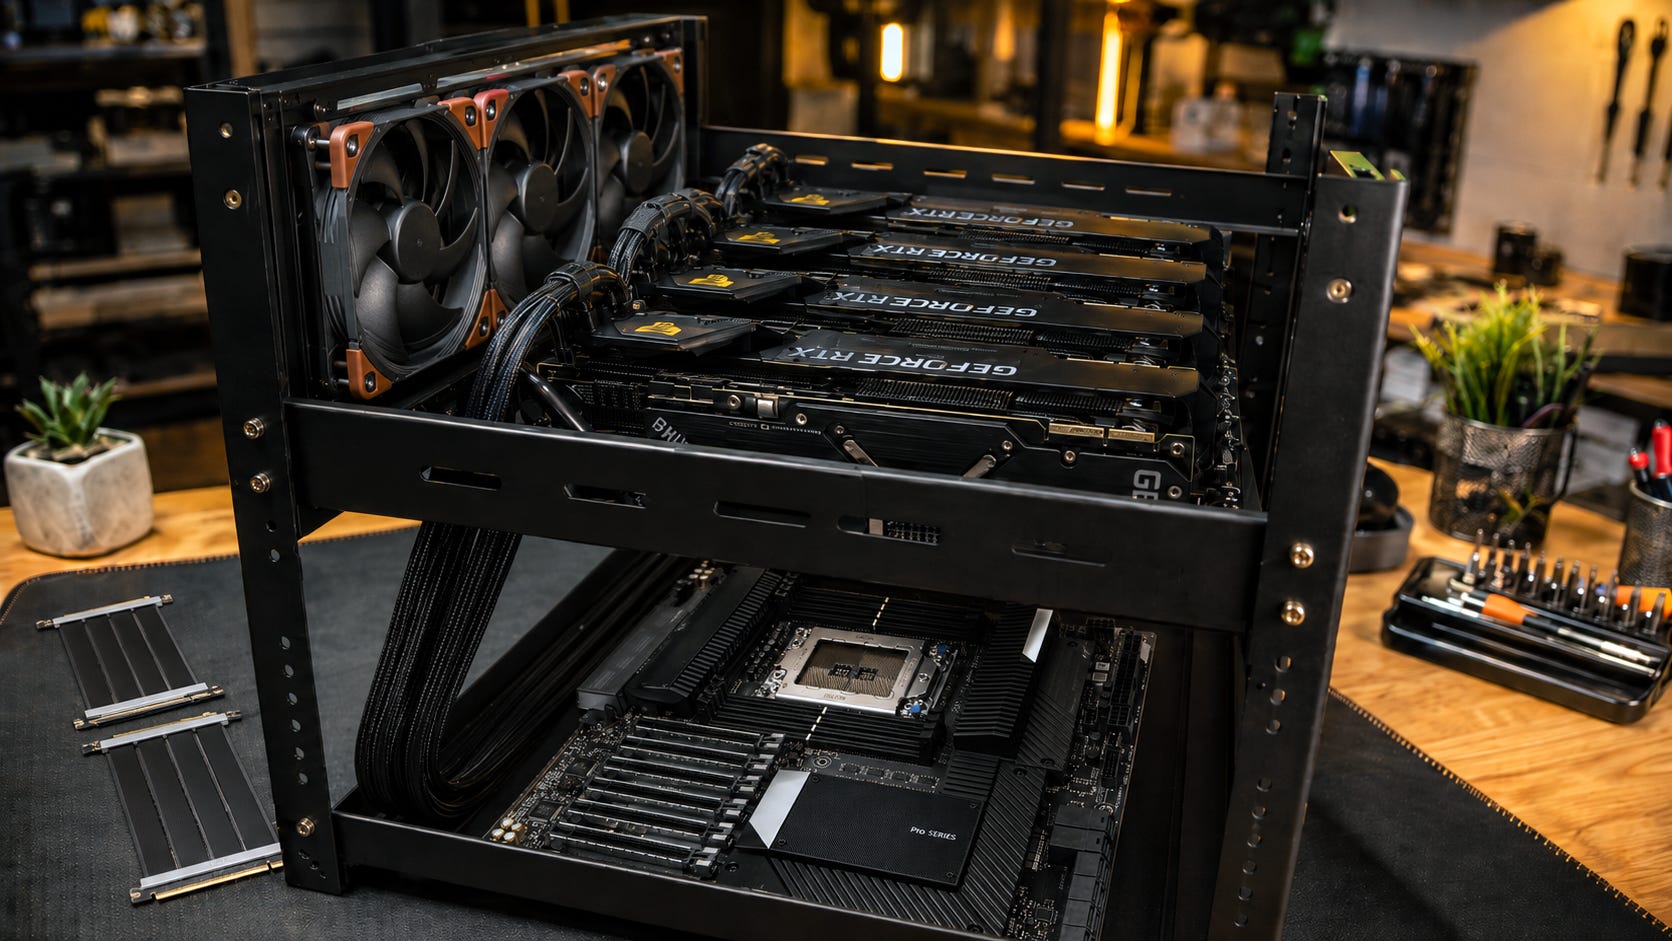
When the cards are too large or the Netstor costs more than the convenience is worth, the best-value single-node solution is a remote-mounted, open-frame WRX80 server. Place the motherboard on one rigid deck, install the four graphics cards in a separate ventilated GPU bank, and connect them to four full-bandwidth motherboard slots with short PCIe x16 riser cables. This layout separates GPU spacing from motherboard slot pitch, which is the central physical problem with four thick cards.
For the custom build, a used WRX80 platform is usually a better fit than a new WRX90 system. The RTX 3090 is a PCIe 4.0 card, so the PCIe 5.0 and DDR5 platform premium of WRX90 adds little practical value here. An ASUS Pro WS WRX80E-SAGE SE WIFI II paired with a Threadripper Pro 5955WX already provides the lanes, memory channels, remote management, and four direct x16 links this server needs.
Both routes are large, loud, and electrically demanding, but they provide a workable path to 96GB of aggregate VRAM when you already own four RTX 3090 cards and one workload needs access to all of them.
More on RTX 3090 AI servers:

4x RTX 3090 AI server quick verdict and key takeaways
The easiest option is the Netstor NA265A-G4. It provides four triple-width GPU positions, integrated cooling, an internal 1650W or 2000W power supply, an included PCIe Gen4 x16 host adapter, and external cabling in one 4U enclosure.
Choose the Netstor when every card fits within its 320 x 130mm published length and height limits and one shared PCIe 4.0 x16 host link suits the workload. The remaining question is whether the purchase price is acceptable.
The best-value custom option is the WRX80 open-frame build. Use an ASUS Pro WS WRX80E-SAGE SE WIFI II, an AMD Threadripper Pro 5955WX, 256GB of eight-channel ECC DDR4, a 4TB NVMe SSD, a true 2000W power supply running from 200 to 240 volts, and four short shielded PCIe x16 riser cables.
Mount the cards about 90mm apart on a rigid aluminum-extrusion frame. Aim a wall of high-airflow fans into the card intakes. Start near a 275W power limit per GPU, then benchmark the real workload before raising it.
Do not use USB-style x1 mining risers. Do not force the cards into an eight-slot case. Do not expect four RTX 3090 cards to behave like one ordinary 96GB GPU.
Four 3-slot cards require roughly twelve physical expansion-slot positions. The Netstor solves that problem with a purpose-built external chassis, while the WRX80 design solves it with a remotely mounted GPU bank.
The Netstor’s four downstream slots ultimately share one external PCIe 4.0 x16 host connection. The custom WRX80 build gives every card a direct motherboard link in the recommended four-GPU slot arrangement and is the stronger choice for workloads that move large amounts of data between the host and several GPUs.
Four stock 350W RTX 3090 cards can demand 1,400W before the CPU, motherboard, memory, storage, and fans are counted. The Netstor and the custom build both require careful attention to PSU configuration and AC input voltage.
Four cards provide 96GB of aggregate VRAM. The software must still split the model or workload across four separate GPUs.
Two dual-GPU servers remain easier to cool and maintain, though they are a weaker fit when one model needs all four cards.
How this build differs from broader 4x and 8x RTX 3090 guides
Our broader guide to 4x and 8x RTX 3090 local AI servers covers several valid hardware paths. Those include dual-slot blower cards, water-blocked cards, open frames, expansion chassis, EPYC servers, Threadripper Pro workstations, and separate GPU nodes.
This guide begins with a more specific problem: you already own four cards, and every card occupies three slots.
That fact removes several otherwise reasonable options. An eight-slot SilverStone RM44, RM52, or RM53-502 cannot directly hold twelve occupied card positions. Replacing the cards with dual-slot models would abandon the premise. Converting four cards to water blocks would introduce cost, leak risk, pump and radiator complexity, maintenance, and possible PCB compatibility problems.
There are two serious single-host solutions.
The first is a purpose-built expansion enclosure such as the Netstor NA265A-G4. It solves the physical mounting, cooling, power, enclosure, and host-connection problem in one product. It is the easiest route when the cards fit its published dimensions and the price is acceptable.
The second is the custom WRX80 open-frame build covered step by step below. It costs less, can accommodate cards that exceed the Netstor’s dimensional limits, and gives every GPU a direct motherboard connection. The tradeoff is more fabrication, more cable planning, more exposed hardware, and more commissioning work.
The platform recommendation applies to the custom path. WRX90 remains a strong choice for a new, high-budget workstation, and used EPYC remains attractive for server buyers. Four PCIe 4.0 RTX 3090 cards, however, do not require an expensive PCIe 5.0 workstation. A used WRX80 board and Threadripper Pro 5000 processor can supply the required lanes without charging you for capabilities the cards cannot use.
The power recommendation is stricter as well. A 1600W supply can work in carefully limited configurations, but it should not be the default for four stock 350W cards. The custom build starts with a 2000W supply, validates the electrical circuit, and then reduces sustained demand through GPU power limits. The Netstor buyer should select the correct internal PSU option and confirm its AC input and GPU cable configuration with the distributor before ordering.
More on the RTX 3090 for local AI:

Why normal PC cases fail with four triple-slot cards
The number of PCIe connectors on a motherboard says nothing about whether four large graphics cards will physically fit.
The MSI RTX 3090 Ventus 3X measures 305 x 120 x 57mm. The ASUS ROG Strix RTX 3090 measures 318.5 x 140.1 x 57.8mm and occupies 2.9 slots.
Four 57.8mm cards placed directly beside one another would consume more than 231mm of width. That calculation still provides no air gap between the coolers. In conventional case terms, the four cards need approximately twelve rear expansion-slot positions.
Even a hypothetical case with twelve openings would not make tightly packed open-air RTX 3090 coolers a good design. Each card would draw air warmed by its neighbor, and the center cards would usually suffer first. Power connectors, riser connectors, and card supports would make the arrangement tighter still.
Remote mounting addresses both failures. It separates physical card spacing from the motherboard slot pitch, and it lets you design the airflow around the real cooler dimensions instead of around standard case geometry.
Who should build this four-GPU server
This article now covers two ways to place four thick RTX 3090 cards behind one host.
Choose the Netstor NA265A-G4 when you want the shortest path to a clean four-GPU installation. It makes the most sense for a rack, office, lab, or business environment where fabrication time, exposed components, and improvised GPU supports are larger problems than the enclosure price. It is especially attractive for inference workloads that keep model weights resident in VRAM and do not constantly saturate the shared host link.
Choose the custom WRX80 build when your cards exceed the Netstor’s dimensions, the enclosure price is difficult to justify, or the workload benefits from four direct CPU-rooted x16 links. The open frame also gives you more control over GPU spacing, fan selection, power delivery, repairs, and future modifications.
Strong use cases for either four-card path include larger quantized local LLMs, private coding models, batch inference, several concurrent model workers, image-generation queues, selected fine-tuning workloads, and research environments where 24GB or 48GB of VRAM has become a genuine constraint. Readers still deciding what runs well on one card can compare the best local LLMs for an RTX 3090 with 24GB before committing to a four-card server.


The design can also suit heavy image-generation workloads, but occasional image creation does not justify the heat and complexity. The practical performance profile of a single card is covered in our guide to RTX 3090 ComfyUI performance in 2026.
Both options are poor fits for casual chat, occasional ComfyUI use, a bedroom workstation, or anyone expecting a quiet appliance. Four RTX 3090 cards produce serious heat even after power limiting. The open-frame version also needs protection from dust, dropped objects, pets, children, and accidental contact.
Choose two dual-GPU systems instead when your jobs can be divided cleanly between machines. Two nodes are easier to move, cool, power, troubleshoot, and resell later. A single four-GPU host earns its complexity when one application genuinely needs access to all four GPUs, or when centralized management matters enough to justify the extra engineering.
More on the RTX 3090 for local AI:

Parts for the WRX80 four-GPU build
The parts below apply to the lower-cost DIY path. Readers choosing the Netstor do not need the custom aluminum frame, four motherboard-to-GPU risers, separate GPU support rail, dedicated GPU fan wall, or 2000W host PSU described here. The host computer still needs its own motherboard, CPU, memory, storage, operating system, and one compatible PCIe x16 slot.
Disclosure: This post includes Amazon affiliate links. If you buy through them, Popular AI may earn a small commission at no extra cost to you.
▪ Motherboard: ASUS Pro WS WRX80E-SAGE SE WIFI II

▪ Processor: AMD Ryzen Threadripper Pro 5955WX

ASUS lists the Threadripper Pro 5955WX as supported, while AMD lists 16 cores, a 280W TDP, ECC memory support, and 128 PCIe 4.0 lanes. Move to a 5975WX or 5995WX only when CPU-heavy preprocessing, compilation, or data work justifies it.
▪ Memory: 256GB of DDR4-3200 ECC RDIMM

Install one matched eight-module kit so all eight memory channels are populated. The suggested A-Tech kit contains eight 32GB, 2Rx4, DDR4-3200 ECC Registered DIMMs, while the ASUS WRX80 board supports ECC R-DIMM and LR-DIMM across eight memory channels.
Compatibility warning: Check the exact module part number against the ASUS memory QVL or obtain written compatibility confirmation before buying. Do not mix R-DIMMs with LR-DIMMs, and avoid combining separate kits with different ranks, memory chips, or revisions even when their advertised capacity and speed match.
▪ CPU cooler: Noctua NH-U14S TR4-SP3

Noctua lists sWRX8 socket compatibility and a total height of 165mm, so check frame and memory clearance before ordering.
Compatibility warning: Use standard-height RDIMMs without tall decorative heat spreaders. Noctua warns that the NH-U14S TR4-SP3 can overhang nearby memory slots and may conflict with modules taller than 32mm. The cooler’s 3mm and 6mm offset mounting positions can improve clearance around the top PCIe slot, but the selected position must still leave enough room for the frame, memory, riser connector, and CPU-fan cable.
▪ Storage: A 4TB NVMe SSD

This will store the operating system, containers, models, caches, and active projects. Add separate backup storage for anything that cannot be recreated.
Compatibility warning: Choose the bare M.2 2280 version rather than the factory-heatsink version when installing it beneath the motherboard’s M.2 cover. The ASUS motherboard supports PCIe 4.0 x4 drives in all three M.2 slots, but M.2_2 disables U.2_1 when populated, and M.2_3 disables U.2_2. Use M.2_1 for the simplest configuration unless another device requires a different layout.
▪ Power supply: FSP Cannon Pro 2000W
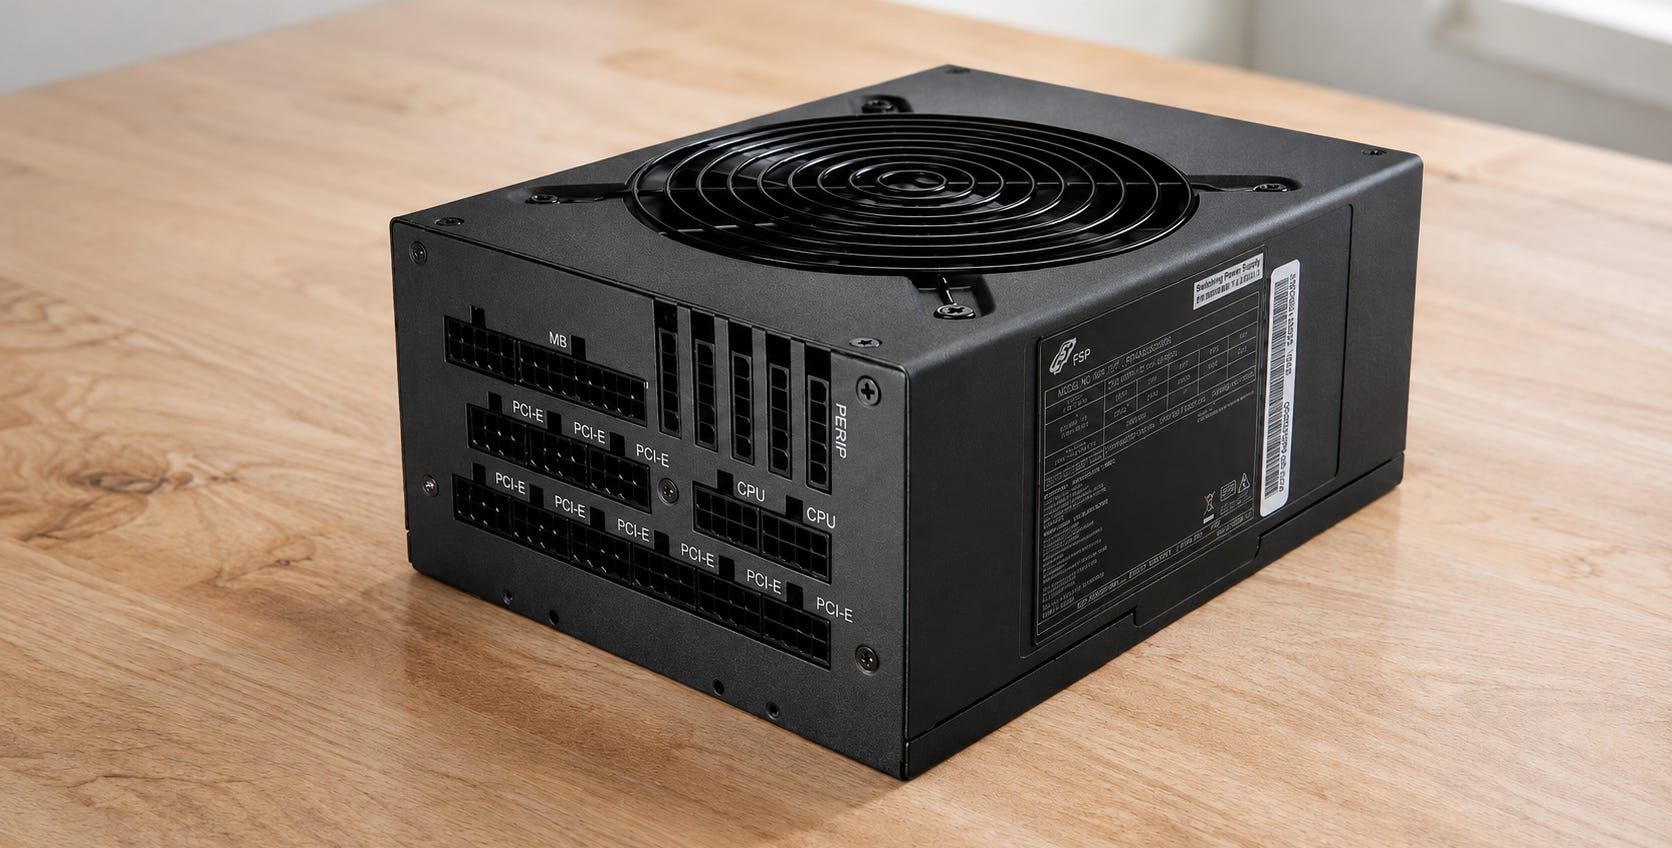
Or an equivalent unit with verified output, input-voltage requirements, protections, and enough manufacturer-supplied GPU cables.
Compatibility warning: Confirm the exact PSU model, revision, and included cable bundle before ordering. FSP rates the Cannon Pro for 2000W only from 200 to 240V input. Its rated output falls to 1500W from 115 to 200V and 1200W from 100 to 115V. The wall circuit, outlet, PDU, and power cord must therefore support the required voltage and sustained load.
Also confirm that the supplied cables match the connectors on all four RTX 3090 cards. FSP sells Cannon Pro variants with different PCIe cable arrangements, including a newer 12V-2x6 version. The number of connector ends is not necessarily the number of independent cable runs. Never substitute modular cables from another PSU, even when the connectors appear to fit.
▪ GPU risers: Four short shielded PCIe x16 riser cables

Four short LINKUP AVA shielded PCIe 4.0 x16 riser cables, with the connector orientation selected to match the finished frame. About 300mm is a sensible target when the frame accommodates that path. Longer cables are not automatically better.
Compatibility warning: Confirm the connector orientation before ordering. A 90-degree left-angle, right-angle, or reverse connector can route in the wrong direction even when the cable length is correct. Measure the complete path from each motherboard slot to its GPU socket, including bend radius and strain relief.
Buy and test one riser with the motherboard, frame, and one RTX 3090 before ordering four identical cables. The cable must reach without being stretched, folded, creased, or pressed against a sharp frame edge. If a known-good card becomes unstable at PCIe Gen4, test the same slot at Gen3 and replace or reroute the riser before assuming the GPU or motherboard is defective.
▪ Frame: Rigid 2020 or 2040 aluminum extrusion

Use rigid 2040 aluminum (four RTX 3090s are heavy) extrusion for the main structural members, together with a metal motherboard tray, GPU brackets, corner braces, T-nuts, fasteners, nonconductive motherboard standoffs, and separate supports for the far ends of the GPUs.
Construction warning: This is raw framing material, not a complete four-GPU chassis. Four 1000mm rails may not be enough once the motherboard deck, raised GPU bank, fan wall, cross-bracing, and card-support members are included. Draw the complete frame and prepare a cut list before ordering. You may need two packs depending on the final dimensions.
Also buy brackets and T-nuts specifically compatible with the extrusion’s slot geometry. Products described as “2040” can use different slot dimensions, so do not assume hardware from another extrusion system will fit.
▪ Airflow: Four high-airflow 140mm PWM fans

These will make up the GPU air intake wall, plus directed airflow over the motherboard, memory, riser area, and power supply.
Compatibility warning: These are high-speed industrial fans rather than quiet desktop fans. Noctua rates the NF-A14 industrialPPC-2000 PWM at up to 2000 RPM, 107.4 CFM, and 31.5 dB(A) per fan. Four running near full speed will be clearly audible.
Each fan can draw up to 0.18A, so four can draw up to 0.72A before any motherboard, CPU, or exhaust fans are counted. Do not assume that one motherboard header can safely power the complete fan wall. Use a SATA-powered PWM hub such as the Noctua NA-FH1, with the motherboard header carrying only the PWM-control and RPM signals. Mount all four fans in the same airflow direction and verify that they feed the GPU cooler intakes rather than blowing against the cards’ backplates.
▪ Operating system: A supported Ubuntu Server LTS release.
Ubuntu 24.04 LTS receives standard security maintenance through May 2029, while Ubuntu 26.04 LTS extends that window through May 2031. Choose the newer release only after validating the NVIDIA driver, CUDA version, containers, and inference framework required by your workload.
Buying eight matching memory modules is preferable to assembling a random set from several sellers. Matching modules reduce avoidable variables during commissioning, especially when every memory channel is populated.
The same rule applies to modular PSU cables. Component-side connectors can look identical while PSU-side pinouts differ between manufacturers and even between product families. Use only the cable set supplied with the exact power supply or cables explicitly approved by its manufacturer.
What the finished server should look like
This section describes the custom WRX80 build. The Netstor path arrives as an enclosed 4U expansion system and does not require this frame layout.
The motherboard should sit horizontally on a rigid lower deck. The power supply can sit beside it or on a separate level, provided its intake and exhaust remain unobstructed.
The four GPUs should sit in a separate bank. Their intake fans face a dedicated wall of high-airflow fans. Their rear edges and I/O brackets need mechanical support so no card hangs from a riser connector.
A workable starting point is approximately 90mm between GPU centerlines. A 58mm-thick card then receives roughly 32mm of open space before the next card begins. A 63mm card receives about 27mm.
Those measurements are design targets rather than universal dimensions. Measure all four cards before cutting extrusion or drilling brackets.
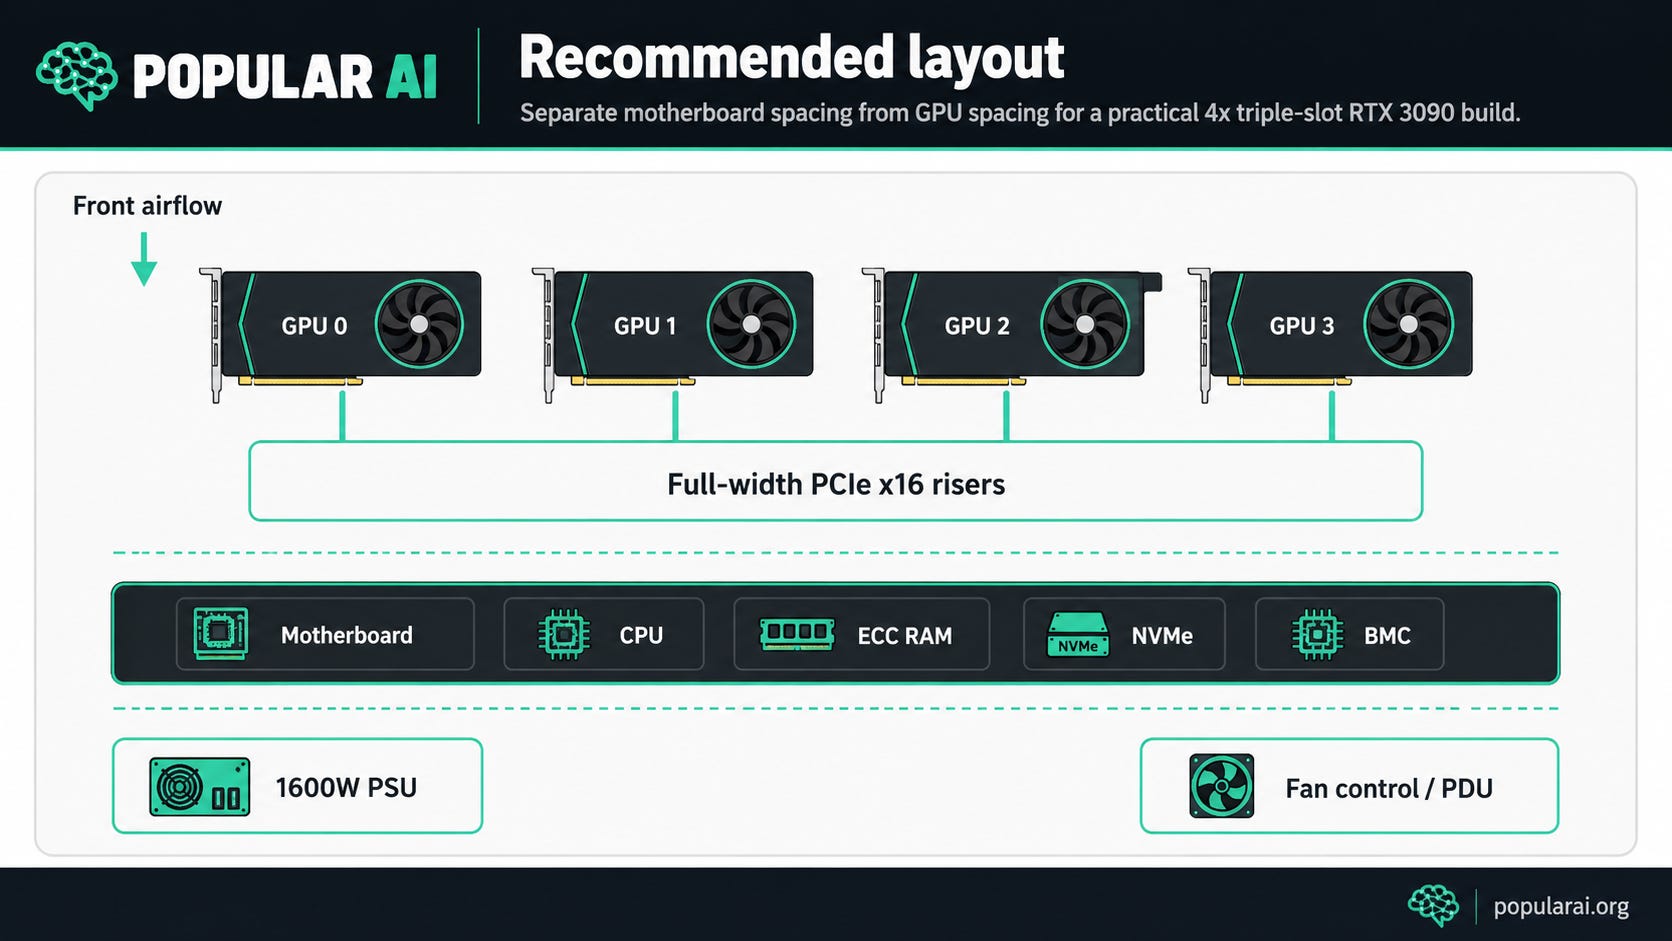
Allow at least 50mm above the GPU power connectors for cable bends. Some connectors point upward, while others sit at an angle or are recessed into the cooler. A sharp cable bend can put unnecessary force on the socket and may interfere with the next card.
Support each card at both ends. The riser socket is an electrical connection, not a structural bracket. Long RTX 3090 coolers are heavy enough to twist or sag when the far end is unsupported.
Add a guard or enclosure around exposed components if the machine will be accessible to children, pets, dropped screws, tools, or other conductive debris. An open frame improves cooling, but it does not make exposed electronics safe from accidental contact.
Step 1: Inventory and test every RTX 3090
Record the exact model number, dimensions, cooler thickness, power-connector count, connector location, and fan direction of every card.
Do not assume all RTX 3090 models use the same wiring. The MSI Ventus example uses two 8-pin inputs. The ASUS Strix uses three. Cards with similar names can also differ in cooler shape, PCB layout, and connector position.
Test each card by itself before building the server. Run the inference, training, or rendering workload you expect to use. Record temperature, fan speed, stock power draw, and behavior at 300W, 275W, and 250W.
This baseline catches failing memory, damaged fans, unstable overclocks, dried thermal interfaces, or poor thermal-pad contact before four GPUs and four risers make diagnosis harder. It also tells you whether one card naturally runs hotter than the others.
Label each card as GPU A through GPU D. Keep the label consistent through the whole build, even after Linux assigns numerical GPU indexes. Physical labels make it far easier to trace a thermal or PCIe error back to the correct card.
Step 2: Assemble and validate the WRX80 platform
Install the CPU, cooler, eight memory modules, boot SSD, and power supply before connecting any remote GPU.
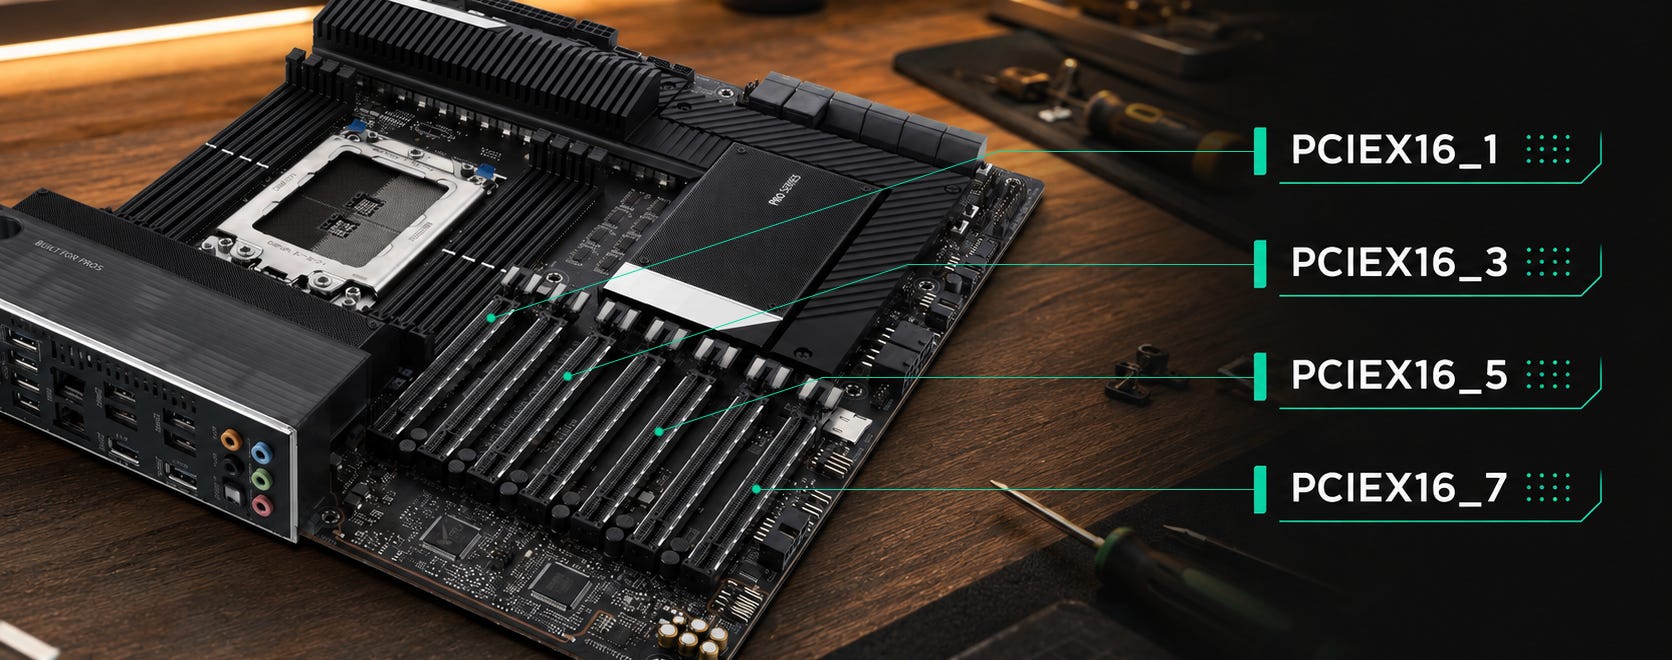
The ASUS WRX80E-SAGE SE WIFI II provides seven full PCIe 4.0 x16 slots. Its documentation also identifies two supplemental 6-pin PCIe power inputs and an additional 8-pin input intended to improve stability under heavy multi-GPU loading.
Connect the 24-pin motherboard cable, both CPU EPS connectors, and every required motherboard PCIe auxiliary input. Do not leave supplemental slot-power connectors unplugged in a four-GPU build.
The board’s BMC and remote KVM are useful during commissioning. Use the onboard management graphics rather than assigning one RTX 3090 to display duties. Once networking is configured, the server can be managed without a local monitor or keyboard.
Boot the board before installing all four GPUs. Update to a current stable BIOS, then verify memory capacity, storage, BMC access, fan control, and both network interfaces. Run a memory test before adding risers, because troubleshooting memory and GPU enumeration at the same time creates unnecessary ambiguity.
Step 3: Build the GPU bank around the actual cards
Mounting holes and cooler dimensions vary enough that a universal four-GPU frame is difficult to recommend without measurements.
Build or modify the frame after inspecting the cards. Start with approximately 450mm of usable width for the GPU bank, then adjust for cooler thickness, desired air gaps, brackets, power cables, and fan mounts.
The GPU rail must prevent twisting. Secure the I/O bracket and the far end of every card. Long RTX 3090 coolers can flex when supported from only one side, especially during transport or cable installation.
Keep riser cables away from sharp bends, fan blades, and hot exhaust. Do not crease them or clamp them beneath metal brackets. Leave enough slack for strain relief without creating large loops that complicate airflow or signal routing.
The fan wall should push cool air into the open faces of the card coolers. Aiming fans at solid backplates will not correct blocked card intakes. Verify the airflow direction on every GPU and every frame fan before final assembly.
Step 4: Wire the power system safely
The RTX 3090 provides 24GB of GDDR6X memory, and many partner cards carry a board-power rating near 350W. Four such cards can demand about 1,400W at stock settings.
The Threadripper Pro 5955WX has a 280W TDP. The motherboard, eight memory modules, NVMe drive, BMC, network controllers, fans, and conversion losses still require power. Four unrestricted cards can therefore push the machine uncomfortably close to the capacity of a nominal 2000W supply.
That makes the electrical circuit part of the build.
In North America, a properly installed 240V circuit is the sensible route. Do not run this server from an ordinary 120V, 15A receptacle. In countries with typical 230V service, the outlet, breaker, wiring, power distribution unit, and power cable still need to be rated for the sustained load.
Have a qualified electrician verify the circuit whenever there is doubt. A four-GPU server is not the place to improvise with undersized extension cords, cheap power strips, overloaded shared circuits, or repeated breaker resets.
Use only cables supplied or explicitly approved for the exact PSU. Spread GPU power across separate modular cable runs wherever the cable set permits. Ideally, each card should receive at least two independent runs instead of feeding every connector through one heavily loaded daisy chain.
Do not use SATA-to-PCIe adapters, Molex adapters, mystery breakout boards, generic modular cables, or unverified splitters.
FSP lists eighteen 6+2-pin connector ends for the Cannon Pro. That number does not necessarily mean eighteen independent cable runs. Inspect the supplied cable set and map every connection before ordering or powering the build.
Step 5: Configure the BIOS for four GPUs
Enable Above 4G Decoding. Use UEFI boot and disable the Compatibility Support Module where practical.
Set those four slots to PCIe Gen4 initially. Leave unused slots empty while commissioning the server. Extra PCIe devices create more variables and can make topology troubleshooting less clear.
Avoid enabling every experimental PCIe, IOMMU, peer-to-peer, and virtualization setting at once. Establish a stable baseline first. Optimization should begin only after the server can survive sustained load without disappearing devices, PCIe errors, or NVIDIA Xid messages.
Record the working BIOS settings. A photo or exported profile can save hours after a firmware reset or update.
Step 6: Add the GPUs one at a time
Connect the first riser to PCIEX16_1 and install one card in the GPU bank.
Boot the system and confirm that the card appears. Shut down fully, disconnect AC power, allow the system to discharge, and add the next card in PCIEX16_3. Repeat the process with PCIEX16_5 and PCIEX16_7.
This sequence is slower than connecting everything at once, but it identifies the exact card, riser, power cable, or slot that introduces a problem.
Do not hot-plug cards or risers. The physical connectors and this motherboard layout are not intended for casual hot-plugging.
Use short, shielded, full-lane cables such as a 30cm LINKUP AVA PCIe 4.0 x16 riser or another established product with a connector orientation that matches the frame.
USB-style mining risers reduce the connection to an x1 link and are designed for workloads with minimal host-to-GPU traffic. They should not be the default foundation for a serious multi-GPU AI server.
Step 7: Install Linux and apply conservative power limits
Install the NVIDIA driver and verify that all four cards are visible before adding containers, dashboards, model servers, or orchestration software.
Start with a 275W power limit on each GPU:
sudo nvidia-smi -pm 1

for i in 0 1 2 3; do
    sudo nvidia-smi -i "$i" -pl 275
done
NVIDIA’s nvidia-smi documentation covers Linux persistence mode and software power-limit controls.
The selected value must fall within the power range accepted by each card’s firmware. Check the supported range and active limit with:
nvidia-smi --query-gpu=index,name,power.min_limit,power.default_limit,power.max_limit,power.limit --format=csvAt 275W per card, the four GPUs have a combined ceiling of 1,100W. That leaves much more room for the CPU and platform than four unrestricted 350W cards.
A 275W limit is a starting point rather than a universal answer. Benchmark 250W, 275W, and 300W with the real workload. Keep the lowest setting that provides acceptable throughput and latency.
Power-limit settings can reset after a reboot or driver reload. Once the machine is stable, use a small systemd service to reapply them automatically. Test the service after a cold boot instead of assuming it ran.
Step 8: Confirm PCIe detection and topology
Check device detection and topology before loading a large model:
lspci | grep -i nvidia

nvidia-smi -L

nvidia-smi topo -m

nvidia-smi \
  --query-gpu=index,name,pci.bus_id,power.limit,temperature.gpu \
  --format=csv
You should see four distinct RTX 3090 cards. Match each software index to the physical labels created during the inventory step.
Check the negotiated link for each GPU with:
sudo lspci -s <BUS_ID> -vv | grep -E 'LnkCap|LnkSta'Replace <BUS_ID> with the address reported by nvidia-smi.
A PCIe link may enter a lower-power state while idle, so repeat the check while the GPU is active before concluding that the link is running below its configured generation.
If one card is unstable at Gen4, force that slot to Gen3 and test again. PCIe 3.0 x16 still provides substantial bandwidth and can be a reasonable stability trade for inference workloads. Treat Gen3 as a diagnostic and compatibility fallback. It should not become an excuse to ignore a defective riser, damaged connector, or poor cable path.
Step 9: Run a sustained four-GPU validation workload
A successful boot proves very little. The server must remain stable after the cards, cables, and power system have warmed up.
Run a real workload across all four GPUs for at least 30 to 60 minutes while monitoring temperature, power, PCIe behavior, and kernel messages.
watch -n 1 nvidia-smiIn a second terminal:
sudo journalctl -k -fWatch for disappearing GPUs, NVIDIA Xid errors, PCIe Advanced Error Reporting messages, thermal throttling, sudden clock drops, fan anomalies, or one card behaving differently from the other three.
Repeat the test after a full thermal soak. Riser, cable, and memory problems often appear only after sustained load. A machine that passes a five-minute test can still fail after an hour when connectors and components reach steady-state temperatures.
Do not begin tuning model parallelism until the hardware passes this validation consistently. Software tuning is difficult to interpret when the underlying PCIe or power system is unstable.
Why four RTX 3090 cards do not become one simple 96GB GPU
NVIDIA specifies 24GB of GDDR6X memory per RTX 3090. Four cards therefore provide 96GB of aggregate VRAM.
The word aggregate matters. Each GPU owns a separate memory space. The software has to divide model weights, layers, tensors, KV cache, batches, or independent jobs among the cards.
The current llama.cpp multi-GPU documentation describes layer splitting as the default and most compatible mode. It places contiguous groups of layers on different GPUs and reduces the amount of data that must cross between them. Its experimental tensor-parallel mode performs more cross-GPU communication and is more sensitive to interconnect performance.
For an initial test, use the default layer mode:
llama-server -m /path/to/model.ggufllama.cpp can distribute layers according to available memory. Use a manual tensor split only when the automatic result is poor or the cards have different amounts of usable memory.
This distinction affects model selection. A model whose weights barely fit within 96GB can still need additional space for context and KV cache. Leaving several gigabytes free on each GPU is safer than loading every card to the last available megabyte and then triggering an out-of-memory error at a useful context length.


Popular AI’s guide to why Ollama and llama.cpp slow down when models spill into system RAM explains why keeping the working set on the GPUs matters so much.
For workloads that do not require one large model, four independent workers can produce better total throughput than routing every request across all four GPUs. The ideal software layout depends on whether the goal is maximum model size, maximum concurrent throughput, or minimum latency for one request.
Common errors and fixes
⚠ Error: Only three GPUs appear
▪ What it means: One card is not enumerating, firmware has not allocated enough address space, or a card, slot, riser, or power connection is failing.
▪ How to fix it: Confirm Above 4G Decoding is enabled. Update the BIOS. Verify that all motherboard auxiliary GPU-power inputs are connected. Remove the fourth card and confirm the first three work, then move the missing card to a known-good riser and slot.
▪ How to prevent it: Commission the system one GPU at a time. Label every card, riser, power cable, and motherboard slot. Keep a simple record of which combinations have passed testing.
⚠ Error: The server locks up or logs Xid or PCIe errors
▪ What it means: Likely causes include poor riser signal integrity, an incomplete connection, unstable PCIe Gen4 operation, inadequate power delivery, excessive heat, or a failing card.
▪ How to fix it: Return every GPU overclock to stock. Lower the power limit. Reseat the riser at both ends. Swap it with a known-good cable. Check power-cable distribution. Force the affected slot to PCIe Gen3 and retest.
Gen3 stability does not prove that the riser is healthy. It may show only that the connection cannot sustain the higher signaling rate required by Gen4. Replace or reroute the suspect cable before trusting the machine with long jobs.
⚠ Error: One GPU runs much hotter
▪ What it means: Its intake may be blocked, the card may have poor thermal contact, hot exhaust may be recirculating, or the four cards may use different cooler designs.
▪ How to fix it: Increase spacing around that card, verify fan direction, inspect its fans, clean the cooler, and compare its temperature with the single-card baseline recorded before assembly.
A card that ran 10°C hotter by itself is unlikely to improve in a four-GPU bank. The baseline test helps distinguish a frame-airflow problem from a card-specific thermal problem.
⚠ Error: The circuit breaker trips
▪ What it means: The electrical supply is inadequate for the actual load, or another appliance shares the circuit.
▪ How to fix it: Stop using the server until the circuit, outlet, wiring, cable, PDU, and PSU input requirements have been checked.
Do not respond with a larger extension cord, a cheap power strip, or repeated breaker resets. The correct fix is an electrical supply that is properly sized and installed for the sustained load.
⚠ Error: The model fits but performance is disappointing
▪ What it means: Aggregate VRAM solved model placement, but the workload may now be limited by cross-GPU communication, CPU offloading, context size, an unsuitable split mode, or weak batch utilization.
▪ How to fix it: Verify that all intended layers remain on the GPUs. Compare llama.cpp layer splitting with tensor mode only when the model architecture and backend support it. Confirm NCCL is available when the backend expects it. Test smaller context sizes and larger batches separately so you know which change affects throughput.
For workloads that do not need one large model, independent workers can deliver better total throughput than forcing every request through all four cards.
The cleaner 4U rackmount alternative
The Netstor NA265A-G4 is a purpose-built 4U GPU expansion chassis for up to four triple-width PCIe cards, and it is the easiest professional solution in this article when the exact cards fit.
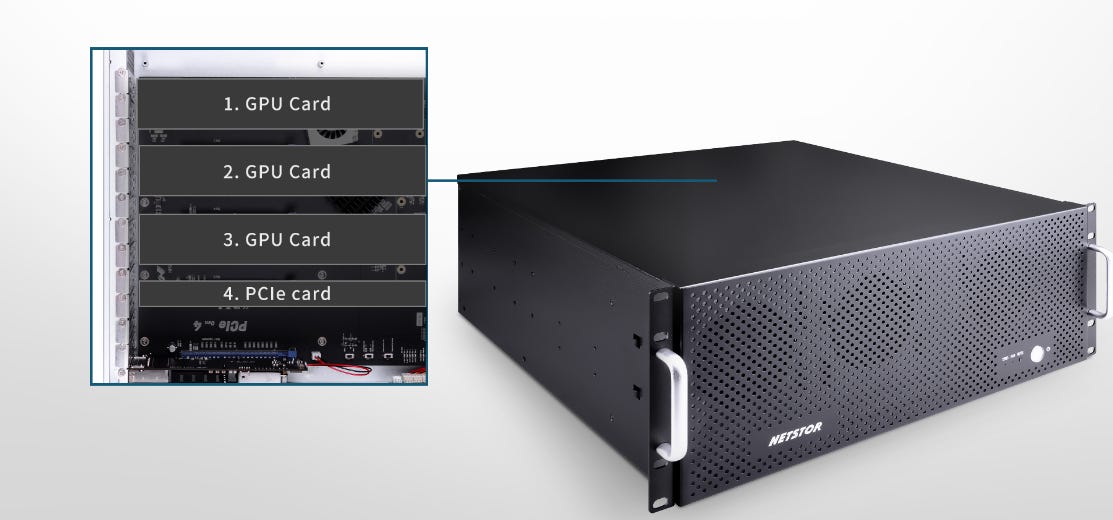
The chassis combines four PCIe 4.0 x16 downstream slots, three 75 CFM front fans, an internal 1650W or 2000W power supply, a PCIe Gen4 x16 host adapter, and four 1.5-meter external mini-SAS HD cables. The host needs one non-bifurcated PCIe Gen4 or Gen5 x16 slot. That removes the need for a fabricated aluminum frame, four flexible motherboard risers, an improvised GPU support rail, an exposed GPU bank, a separate fan wall, and most of the custom GPU-power planning.
The Netstor link is not an affiliate link because Popular AI does not have a verified affiliate route for the product. It is still the first option readers should examine because it directly solves the four-triple-slot-card problem. The enclosure is expensive, but it is not merely a case. It is a powered PCIe expansion system with its own cooling, host interface, cabling, and GPU power supply.
The term triple-width does not guarantee that every RTX 3090 will fit. Netstor publishes a maximum card size of 320mm long and 130mm high. The 305 x 120mm MSI Ventus falls within that envelope. The 318.5 x 140.1mm ASUS Strix exceeds the published height limit. Measure every card and include the power-connector bend, cooler shroud, backplate, and any adapter clearance before ordering.
The four GPU slots ultimately share one external PCIe Gen4 x16 host connection. Workloads that load weights into VRAM and avoid constant host transfers may tolerate that arrangement well. Communication-heavy tensor parallelism, frequent CPU offloading, and jobs that move large data sets between the host and several GPUs have less aggregate host bandwidth than the custom WRX80 layout with four direct CPU-rooted x16 links.
Power cabling needs explicit confirmation. Netstor’s current product page emphasizes supplied 12VHPWR power cables, while RTX 3090 cards commonly use two or three 8-pin PCIe sockets. Ask the seller to confirm the exact 6+2-pin cable set, internal PSU option, AC input requirement, and support for your four specific card models in writing.
Use the official Netstor distributor directory to find a regional seller and request a compatibility-checked quote. Confirm card dimensions, supplied power cables, input voltage, lead time, warranty coverage, and return terms before paying.
The Netstor is the best choice for convenience, enclosure quality, and a clean rack installation. The custom WRX80 open frame remains the better-value design, accommodates a wider range of card shapes, and gives each GPU a direct motherboard link.
When two dual-GPU servers are the better choice
Build two dual-GPU machines when most jobs can run independently.
Each node is easier to power and cool. A failed card, riser, motherboard, or PSU takes down only half the capacity. You can place the machines on separate electrical circuits, upgrade them independently, and move them without handling one exceptionally heavy open frame.
Popular AI’s dual RTX 3090 local AI guide covers the tradeoffs of a 48GB two-card system, while the guide to three dual-GPU AI PC builds for local LLMs shows more conventional two-card layouts.
The weakness is cross-node work. Splitting one model across machines requires a distributed backend and fast networking. Ordinary 10Gb Ethernet is useful for storage, management, and serving traffic, but it does not replace local PCIe links in a communication-heavy tensor-parallel job.
Choose two nodes for independent workers, image-generation queues, separate users, redundancy, easier maintenance, or staged upgrades. Choose the four-GPU WRX80 node when one process genuinely needs all four cards or one operating system must manage the complete workload.
More on dual RTX 3090 local AI builds:

Final build checklist
Record the exact dimensions and power connectors of all four cards, then compare them with the Netstor’s 320 x 130mm limit before committing to the custom build.
Test every GPU alone at stock power and at the intended power limit.
Use motherboard slots PCIEX16_1, PCIEX16_3, PCIEX16_5, and PCIEX16_7.
Connect every required CPU and auxiliary PCIe power input on the motherboard.
Use four short, shielded, full-length PCIe x16 risers.
Mount every GPU at both ends and leave an intentional air gap.
Use a 2000W PSU on the input voltage required for full output.
Use only manufacturer-approved modular power cables.
Enable Above 4G Decoding and boot in UEFI mode.
Add the GPUs one at a time.
Start near 275W per card and benchmark the 250W to 300W range.
Check PCIe topology and negotiated link status under load.
Run a sustained four-GPU validation job before configuring production services.
Keep local backups of models, configurations, containers, and service files.
Measure actual wall power after the system is stable.
More on multi-GPU local AI builds:

FAQ
Can four 3-slot RTX 3090 cards fit in an eight-slot case?
No. Four 3-slot cards occupy approximately twelve rear expansion-slot positions. An ordinary eight-slot case can directly hold four cards only when each card stays within a two-slot allocation. A purpose-built expansion chassis such as the Netstor NA265A-G4 can house the four cards outside the host, while the lower-cost alternative is the remote-mounted WRX80 frame described in this guide.
Is PCIe 3.0 x16 enough for an RTX 3090 AI server?
It can be enough for many inference workloads, especially when model weights remain on the GPUs and cross-GPU traffic is modest. PCIe 4.0 x16 is preferable. Gen3 is a useful fallback when a difficult riser path is unstable at Gen4, but it should also prompt a careful check of the riser and connectors.
Do four RTX 3090 cards behave like one 96GB card?
No. They provide 96GB of aggregate VRAM. The inference or training software must divide the workload among four separate memory spaces.
Do I need NVLink?
No. Software such as
llama.cppcan distribute work across multiple GPUs without NVLink. NVLink can help selected communication-heavy workloads, but bridge spacing and remote card placement make it impractical as the foundation of this four-card layout.
Can I use USB mining risers?
They are not recommended for this server. Use shielded x16 risers connected to motherboard slots that provide x16 or at least x8 electrical links.
Is a 1600W PSU enough?
It may work with strict GPU power limits, low CPU load, careful cable planning, and measured wall consumption. It is not the safe default for four cards that can demand 1,400W at stock. A 2000W FSP Cannon Pro, or an equivalent verified supply on the correct input voltage, provides a more defensible margin.
The best 4x RTX 3090 AI server layout for triple-slot cards
For four existing 3-slot RTX 3090 cards, the easiest professional solution is the Netstor NA265A-G4 when every card fits within its 320 x 130mm limits and the purchase price is acceptable.
The Netstor provides the enclosure, GPU mounting, cooling, internal power, PCIe backplane, host adapter, and external cabling in one system. It is the better choice for readers who want a clean rackmount installation and do not want to fabricate an exposed GPU frame. The tradeoff is cost, strict card dimensions, and one shared PCIe 4.0 x16 host connection.
The custom WRX80 open-frame server remains the best-value option. Use the ASUS Pro WS WRX80E-SAGE SE WIFI II and Threadripper Pro 5955WX as the foundation. Populate all eight memory channels with 256GB of ECC DDR4. Connect the cards through four short x16 risers in the motherboard’s recommended slots. Power the machine from a true 2000W supply on 200 to 240V input, then begin testing near 275W per card.
Choose the Netstor for convenience, enclosure quality, and faster deployment. Choose WRX80 for lower cost, fewer card-size restrictions, easier component-level repairs, custom airflow, and four direct motherboard links. Choose two dual-GPU nodes when the workload can be divided cleanly between machines.
Trying to direct-mount twelve slots of graphics cards into an eight-slot case is a geometry error. A purpose-built expansion chassis or a measured remote-mount layout can solve the same problem. The right answer depends on whether you would rather spend money on the enclosure or spend time engineering the frame.
Explore more from Popular AI:
Start here | Local AI | Fixes & guides | Builds & gear | Popular AI podcast
If you were building a 4x RTX 3090 local AI server today, what would worry you most: GPU fit, power draw, cooling, or PCIe bandwidth?